Dicky
-
Posts
1,626 -
Joined
-
Last visited
Content Type
Profiles
Forums
Events
Gallery
Store
Everything posted by Dicky
-
Mine did as well before I had them bled. However afterwards the pedal travel appeared much less, but now it seems to have gone back to where it was. I understand that pad wear should make little difference, and I don't appear to be dropping fluid anywhere, so all I can think is there must be problem elsewhere. I could be wrong but I fancy I'd read some time ago of members having this kind of problem
-
Had the brakes bled just before Xmas. After initial problems the main dealer finally managed to get the brake pedal rock hard (after giving them the bleeding order provided by the forum). I'm now noticing a greater travel on the pedal before resistance is felt. A friend suggests it could be a deteriorating flexi brake pipe expanding under pressure....anyone experienced this..? I was wondering if it might be a problem with the master cylinder. Can anyone help with suggestions please
-
Yep reverse was fully engaged. I'm thinking I may have revved the engine a bit to high to counter the slope but I'm sure a new clutch wouldn't whine so much. Can't comment on the night of the clutch pedal as I've nothing to compare its height to. I didn't take a mental note on its height when new. Im going to have to reverse up the drive again tomorrow so I'm going to take it very easy and see if it happens again.
-
I've got a 2004 Z with 76k of fairly normal driving on the clock. My drive is moderatly steep and I had to reverse up it today. The clutch didn't seem to like the experience because it made a fairly hi pitched whining noise as I drove up. Dipping the clutch and trying again produced the same noise,there was a little bit of a smell as well, however the car did move backward. Anyone else noticed this affect. Is it normal or do you think the clutch is on its way?
-
Many thanks guys and apologies for the late reply, I've been away.
-
Looking to fit the SGS struts but looked at the search results and those I read have insomnia spoilers fitted. So, since mine has the oem spoiler, do I still fit the uprated Nismo struts or are the standard replacement struts the correct ones? Thanks in anticipation
-
You live and learn. Lifting the window switch and keeping it up while the window lifts I suppose is manual then? One post I read referred to raising the window "manually". That probably makes sense to you younger guys but to me manual means I start looking for a winding handle
-
Not somewhere I'd want to sit.......dreadful but each to their own!
-
Needed to carry out this procedure today and found it and some of the previous comments made by others a bit confusing so thought I'd try to clarify it for those as challenged as me. I've edited out the unnecessary bits of the Workshop manual procedure and copied it below for reference. In order to carry out step 3) of the procedure you have to operate the "reset switch" located behind the door card, but if you take door card off to gain access you cant shut the door to operate the door switch as required by step 2)????? Another confusion was In the "CAUTION SECTION" where it states, do not use the window auto function to raise and lower the window. What is the "auto function"?? Other than the door mounted switches??? Anyway, the idiots guide is as follows... 1) remove the door card and allow it to hang by the wires and bowden cables. 2) locate the reset switch behind one of the circular black stick on discs. 3) use a G clamp to operate the door switch or get someone to help 4) turn on the ignition (don't start the engine though) 5) using the door window switch, raise the window right to the top 6) press the reset switch in and using the door window switch, lower the window right to the bottom. 7) release the reset switch and now raise the window right to the top again. 8) turn off the ignition, remove the G clamp and check window operation. Also note that if you've removed the larger of the two white plugs on the door window switch control panel You can experience poor connections due to the free socket not mating with the fixed plug correctly. I had to use a pair of snipe nose pliers to push the wires down to ensure contact with the fixed plug contacts. Resetting 1. With the door open, lift up and hold the power window switch until the door glass is fully closed. 2. Get inside the vehicle and close the door. â— You need to close the door so the door switch is fully depressed. 3. Press and hold the reset switch. While holding the reset switch, press down and hold the power window switch until the door glass is fully opened. 4. Release the reset switch.Then, lift up and hold the power win- dow switch until the door glass is fully closed. 5. Open the door to release the door switch. The door glass should partially move down. C CAUTION: â— Do not use the window auto function. â— Do not release the switch before the window is fully stopped
-
Same happened on my last set of Bridgestones. I had the tracking checked by two garages and both said it was ok. To be fair I didn't check tyre pressures every week so could have has some kind of wear due to that. When I got my current new set of new Bridgestones I measured the the tread depth when I got home and noticed the tread depth varied across the tyre width. The outside depth was 6mm the centre 8mm and the inside depth 7mm. I rang Bridgestone to clarify and they confirmed these depths to be correct. May have something to do with your problem?
-
Like the idea with the Citroen. Doesn't much matter on door shapes I wouldn't think because when someone's door opens the section that sticks out most will be the section that impacts the highest section of my car. So long as my tube is sticking out the furthest from my car body then that's what will get hit first I would have thought. Anyway think it will protect against the vast majority of cars out there and remember it will only be used when I've got no other alternative but to parallel park, multi story parks, city centre parking and the like.
-
Now there's a really good idea!
-
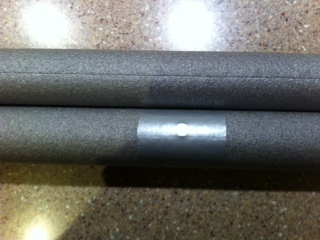
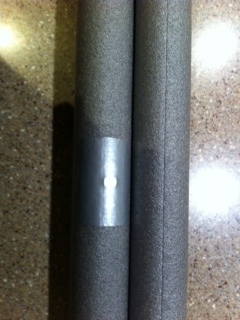
Just thought, if your feeling creative, the magnets I found to be best (after a bit of searching) are.... http://www.first4magnets.com/circular-disc-rod-magnets-c34/10mm-dia-x-5mm-thick-x-3-2mm-c-sink-neodymium-magnet-2kg-pull-p2640#ab_1-1%7Cps_2-899/s899 I used a soldering iron to burn down 10 mm into the insulation tube (which is about 20 mm thick) to sink the magnets flush then used tape to cover them over keeping them in and to prevent scratching paintwork. I decided to use 3 magnets per 1m length of tube (find what's best for your application) I intend putting a small countersunk screw through the magnet holes, securing with a nut and washer on the inside of the tube. Also on the inside of the tube, soldering some 1.5mm steel wire (from B&Q) between each screw end along the length. If you have two lengths of tube per side, then run the wire to the other tube and do the same. Then from the exposed wire between tubes IE at a point between doors, make a crimp connection to another piece of wire which will be taken through the drivers/passangers door and secured inside the car. Any exposed wire or any coming into contact with the paintwork will be covered with suitable electrical sleeving/other. If you can be bothered........Enjoy!
-
Ok....I'll hang the wife's knickers off them, maybe that'll help...........although on second thoughts, maybe not cos I make tents out of them in summer lol I'm guessing she doesn't read this forum :lol: Dead right she doesn't. I'm hiding in the cupboard under the stairs to write the comment...so don't tell her now
-
Ok....I'll hang the wife's knickers off them, maybe that'll help...........although on second thoughts, maybe not cos I make tents out of them in summer lol
-
Oops again...apologies Ekona I missed the "like" comment and somehow got to pressing the "unlike"
-
It's a £37k people carrier!
-
I think they would tear me up and spit me out. Lol
-
Fortunately the Z's never been touched only because I'd rather park well out the reach of numb-ties, but other cars I've owned have been...and it can cost a lot to get repaired. The ones I made in 2004 served their purpose but I have to admit to having seen some on Amazon which are now unavailable that caused me to use manners instead (obvious enough now I think of it) They may well get nicked but as I said I'll only use them when I've got no other choice and the security wire I'll fit soon may well deter the opportunist.
-
Oops meant to post on the 350Z forum. Can it be moved? sorry
-
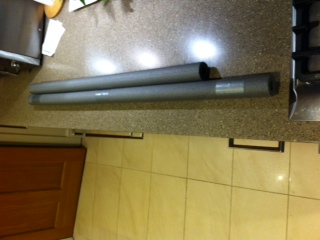
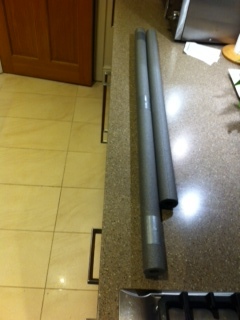
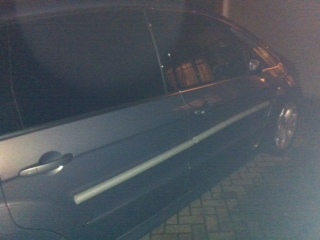
Just knocked up some door side protectors from water pipe insulation tubes, magnets and steel wire. They're based on a set I made in 2004 when I first got the Z using springs and hooks, but now I've used rare earth magnets. I've made them for my wife's new S-Max but will do the same for the Z later. We will still park well away from other cars where possible, but on those occasions you must parallel park they are a cheap yet effective solution. They cost approx £15 to protect both sides. I've not quite finished them yet and will incorporate a security wire to give a degree of theft protection from opportunist thieves. Even if they're nicked they will be cheap to replace. Apologies for the crap pic but crap phone camera and it's dark.
-
I had thought of that but just assumed my battery drill wasn't up to the task. But I'll give it a go after seeing your vid. Thanks
-
Yep
-
At my age I find that getting the car off the ground is half the problem. Apart from this it will be useful for my wife and daughter to carry in my wife's S-Max if ever the need arises.
-
When you get to almost 70 tell me this again lol