

Mikevv
-
Posts
1,069 -
Joined
-
Last visited
Content Type
Profiles
Forums
Events
Gallery
Store
Everything posted by Mikevv
-
Wow, She looks clean! I'm very jelly of your Rays and discs. Only had my car about a week and the previous owner curbed them all over the place. Already want Shadow Chrome refurb soon and multi groove discs GLTWS, should fly out the door ( sad to see her go though )
-
No takers? It's NOW FREE OF CHARGE JUST COME GET IT!!!
-
*** TORQEN *** 350z TORQUE SOLUTION Billet Stubby Antenna
Mikevv replied to Adrian@TORQEN's topic in TORQEN
Too busy enjoying that V6 engine note -
*** TORQEN *** 350z TORQUE SOLUTION Billet Stubby Antenna
Mikevv replied to Adrian@TORQEN's topic in TORQEN
Fits like a glove, have yet to use the radio. Car came from up north and I haven't bothered to re-tune the stations yet hahaa -
Nissan Fairlady 350Z Auto, 11,000 Miles
Mikevv replied to GrahameJ's topic in Introductions & Welcome Messages
Wow it's like new! Good find, and welcome -
There will be a dedicated area for our club I believe Does this mean I can turn up a bit later, and just roll up to you guys and park without the fear of door dings ?? I don't think I can get to the parking lot on time, I'm coming from Ringwood. Just gotta wake up extra early and the GF etc , so maybe pop down later. Probably be rained off anyways, knowing the "English Summer"
-
Sorry mate, I meant do I wax my car before or after I clay it. Logic tells me wax after clay, to "seal" and protect it? Thanks for the tip on Quick detailer. Personally I don't like the idea of cloths either, the point of clay was to literally use it then bin it
-
That's bloody brilliant! Can I ask for a pointer? I'm going to wash the car and clay it, do I wax it before or after the wax? Sorry newbie here. Also, is soapy water enough lubricant for clay bars? Larry at AMMO uses that, and it works for him. I'm either going to use soapy water, or Meguiars quik detailer, but don't want to waste money if I don't have to!
-
Yeah like sandpaper right? Different grades etc Forgive my ignorance, do you mean sort of like a sponge for foam?
-
I've got a machine polisher but not confident on the thin paint :/ maybe try i on my dads company car
-
I bought some Poorboys, a clay bar, and a Meguiars lambs wool wash mitt, with 3 new microfiber Meguiars towels for good measure. The clay bar was £10 for 200g which seemed about the going rate and this one can be used with just plain water, and I even Googled which to get and they gave a top 5 review pahaha who knew they were so different. Just went with the top rated one which was this http://www.bilthamber.com/clay-bars/auto-clay-regular The poorboys was £14 and I figured as my dad has a black car too, might prove useful for both of us so why not The mitt and towels were like £12 each, so not major if they suck. All of which came from Amazon I just wanted my own stuff, tired of using dads towels and them being dirty on a day when I want to wash my car. Now all I need is 2 buckets which I'll pick up next time I'm near a B&Q or something. Going to give the old "double bucket and mitt" method a go, hopefully make less swirls than a damned sponge!
-
I will check out the products you mentioned I keep hearing about this poorboy blackhole stuff, thought it was some kind of joke lol. I'm such a noob when it comes to car detailing :S Going to invest in a couple of clay bars and PoorBoys blackhole tonight.
-
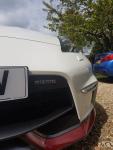
Hi guys, I got my car this weekend, and decided to wash it today. After a good thorough wash, I got all their crappy products off the car which they claimed was " valeted " Well, if that was a valet, I'd demand my money back. Car didn't shine, interior was gross still, and smells awful of those £1 Halfrauds air fresheners. All I did today was wash it with some car shampoo ( the brand escapes me ) and then this Simoniz wash on wax, which you use while the car is still wet. Made a difference, but I'm looking for a deeper shine if I'm honest. After the wash and wax I found some scratches that I didn't see before, and they are not small! Run along the side of the boot glass all the way to my tail lights I'm hoping that a good solid polish will help get rid of them, as I do have some swirl marks I want to get rid of as well. I guess the good news is that I can't feel any of them with my nail, and about 2 or 3 feet away you can barely see them unless you get the right light. There are some weird stains, like a leak from the rear wiper down to the light, almost like a puddle. I tried washing and rubbing gently with a damn microfibre towel, but it didn't come off :S Any tips or suggestions as to how I can remove them? ( I will post some pics close up tomorrow morning when I finish work, bit hard to do on nightshifts ) I've attached some pics so you can see what I mean, the car is clean, but doesn't have that deep shine - Maybe it just needs a good machine polish? Although with the paint about as thick as the skin on my teeth, I'm anxious to give that a go Thanks for the read guys n gals This is of the bonnet/hood, it shines, but not clearly.
-
I figured I'd just do as you suggested, take off the lights and peek through It's mainly just to make sure I don't break stuff or get in the way. doubt they'll need any space really.. My dads done 2 sets of these before without taking the bumper off and they worked flawlessly. The current one we've had for 4 years and not skipped a beat. I think we just wired it in any way that worked and wasn't in the way, cosmetics weren't an issue as IIRC the whole lot was hidden under carpets etc. in the boot And TBH I just want to find the bar so I know where to avoid Like others have said, I'm sure I'll be fine, just nervous as this is the nicest car I've owned and I don't want to hurt it just yet Thanks for the idea to take the lights out though!
-
The only thing I worry about is drilling through/into something important. Going to have to jack it up and have a good look underneath. Yeah I know it's an import
-
I might go, but I'm not sure when. Maybe make a day of it with the GF, first car show/meet together could be fun! What would the plan be, if I came as a part of the group? I'm assuming meet up somewhere before hand and then drive down together
-
Can you be more specific please, as regards to mileage, owners, and age? Also sorry to be rude, what's your budget? I understand 07 on wards would be the HR but you may want say an 08 or 09 for example. Just do what I did, and stalk that "Zeds for sale" section, day and night
-
Yeah I realise that now, sorry haha Well you know what they say, measure twice, cut once! I'm going to triple check these, cause 20 minutes is a lot cheaper than a new bumper ( worst case scenario )
-
Thanks for all the pics guys, definitely going to have a try and get them all on the same level, the fact the middle 2 are higher drives me mad
-
A drill you say? The pack I got with the Dolphin kit contained a drill, hard to explain without pics. It's basically like a normal drill surrounded by a circle cutter sort of thing? Just to make the 20mm hole for the sensor to fit in the bumper? Not sure if I'm making sense, I'm super tired lol It looks like this http://images.shopmadeinchina.com/p/339/4774339/Only-Parktronic-Parking-Sensor-Radar-Kit-Drill-DC_4774339.bak.jpg
-
Yeah sure, If I can plaster this thread with different pics that might help both me and other users to get a rough idea of how we can work it. The old man seems worried about what's behind the bumper for when we drill holes, surely this won't be an issue?
-
See I tried explaining this in a round about way, probably didn't make sense to him , or I didn't explain it well enough. But nice to see I wasn't totally wrong hahaha Your sensors seem pretty much where I was gonna put em, so again, reassuring I'm not a total spanner. Is it me, or are your middle 2 a bit higher? Can I ask if there was any reasoning to this?
-
I considered a cam, but only once I got an aftermarket unit fitted in place of the Bose, but for now I've decided to keep the Bose as it still works well and I like the steering wheel controls If it wouldn't be too much to ask , would you mind posting the pics up here for me? Just so I have a point of reference that I can double check with and plan accordingly. Thanks
-
Hi guys, I'm fitting my parking sensors this weekend hopefully if the weather holds out, and I had an argument with my dad about it. In my opinion surely you can just find the centre of the bumper, then space them out accordingly? Or split the distance into 4 equal sized chunks to make them all cover the same amount? He's adamant that Nissan won't fit them lile that from factory and the specs must be online somewhere about exactly where to fit them. While I agree the height is an issue, I figured just look for the most protruding part of the bumper and fit them accordingly or just by eye. If it doesn't look right, for example on the very bottom of the bumper, then I'm going to move them until I'm happy with their position. Anyways to stop further bloodshed (joking) Does anyone know of the official Nissan specs? I tried googling it, but the pictures are mostly crap, and how will I know which are OEM and which are done by people like me? Any help would be greatly appreciated Now let's hope we can agree on what end of the drill to use -.-
