

Tinyflier
-
Posts
843 -
Joined
-
Last visited
Content Type
Profiles
Forums
Events
Gallery
Store
Everything posted by Tinyflier
-
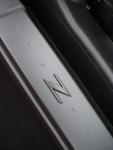
Just fitted the teeny weeny Nisssan badge (from the Bay of E of course) to the recess on the rear of the case - top result! Looks OEM, David
-
It is a TomTom Start 60 and yes the cubby is modified, see if I can explain how! 1) The floor of the cubby has a slot cut in it to allow the unit to sit slightly lower otherwise it will foul on the top inner "shoulders" of the cubby. 2) A very small amount as been removed from the top of the cubby shoulders to allow the unit to sit tilted slightly back (although I don't think that is essential). 3) There is a metal bracket inside the cubby (screwed in from the top) with a strong Velcro pad that grips the other part if the Velcro that is stuck to the unit (that allows me to remove the unit to update it as you need access to rear to plug in USB/PC cable). 4) The power cable is run down inside cubby floor to an adaptor allowing use of supplied power socket adaptor. 5) The rubber inner part in the bottom of the cubby is trimmed to fit around the unit so you can't actually see the slot it sits in. I will post some pics at weekend of the "innards", will give you a better idea. David
-
Try "claying" the wheels in same way you would the body - it might lift these contaminants out. David
-
Should be able to help you with this. EVO-R do their own version of the Veilside front lip. I'll see if they have any in stock at the moment and can also get a price for you. Also interested in this Steve. David
-
It isn't! Some lifting in the complex curve areas. Not sure if this was down to some small area of poor preparation or heat - I need to investigate. Will have to take a pic during the week and post it up. David
-
Nismo for me... David
-
September '12 I bought an '06 Zed in gunmetal grey and instantly the mod itch set in. So far (prior to yesterday I have done/had done the following mods: 1) Stubby aerial 2) B pillar carbon effect (Nismo) garnishes 3) Miltek exhaust 4) Berks HFCs 5) HKS air filter 6) Uprev remap by Abbey Motorsport 7) Fitted widescreen TomTom in upper cubby (near OEM look) 8) Painted rear strut cover (used Plastidip) 9) Carbon wrapped engine cover 10) Carbon effect bonnet hydraulic struts (and removal of bonnet stay) 11) Rear parking sensors 12) Cargo net in boot 13) Rear upper tonneau shelf/shield 14) Boot divider under rear strut brace 15) Thicker/luxury rear boot carpet. 16) Handbrake leather gaiter Some of the mods are shown below. TomTom fitted into cubby - wired to "auto start/shut down" with ingnition. Saturday - apart from wrestling and succeding with the "Flip key" mod, I finally had the painted covers on the front grille removed (they are screwed on, can only reach from through top hole by the radiator or by removing the bumper or undertray - I cheated and had Sly at Kaizer Motors remove them when I paid him a visit...). Then when back home I fitted my Zunsport Grille - and am very pleased with the result. Front with painted covers removed. With Zunsport Grille in place. Wondering whether or not to paint/wrap the part of the bumper under the grille now. Plastidipped rear strut brace cover. Handbrake gaitor I also fitted and had a play with one of these; This gives WiFi connectivity to my iPad and iPhone showing a host of fault codes, information, readings, gauges - sorry the images aren't the best (must get round to sorting out my cubby button mess!) - but you get the idea. You can configure the displays to suit your preference, also has perfromance (acceleration) settings. Is it useful? Perhaps, perhaps not. Is it fun - yes - although for max fun would be best played with while someone else is driving the car! Next major job is refurb of my wheels which scheduled for strip and powder coat March 18th - will bore everyone with pics of those after. Thanks also (in advance) to PapaSmurf - should have my auto mirror fold gizmo fitted soon too. Still a long list of things I want to do... David
-
I've spoken to him today. I'm not fanatical when it comes to polishing, I just want a good result in the quickest time possible. Maybe with a decent machine I will grow to enjoy it. We'll see. When you see the finish you can achieve with a machine polishing - you WILL be addicted...not only to getting a swirl/hologram free finish but also keeping it that way. Is nearly as bad as "Zeditus"....! David
-
That's odd as it was a Timpson shop where I had mine cut. The girl simply said it was at my risk (no problem with that), a few minutes later, job was done and best of all she didnt charge me! Tried it and it works perfectly. David
-
Make a cuppa and have a biscuit and relax No the rubber tray is NOT re-used, it won't fit properly. The best way I found to reassemble is to hold the back half and then line up the keyblade, with button and spring inside, into position. You'll notice a little bit of the spring poking out sideways, which needs to "hook" onto the plastic nib in the seating hole. Once lined up and while still holding everything in position, turn the keyblade counterclockwise (one rotation is sufficient), this will build up the tension. Once done, while holding the whole thing together, line up with the other half (best when it's laying on the table). Whilst landing the back half onto the front half, slip out your finger that has been holding the button down. then just screw it all back together and voila, job done. Hope this helps Ok that has sorted out the flip blade gubbins -cheers! Now will try and get the circuit board to fit! David Just curious, but is your Zed a JDM? The reason I ask is when rodgeevans came round to pick up the exhaust and we disassembled the flip key for the first time, we did notice that the buttons on the JDM OEM key were smaller than the UKDM OEM. If its not that, perhaps use some Blu Tack to position and hold? No it's a UK model... BUT I've done it,,, that was soooo fiddly diddly... Yes I used some blue tack once I had the circuit board in position to secure it. I found then I had to fit the blade, button and spring to THAT side of the case (face down), then use the other half of the case to rotate the spring ( which is quite possibly what you were patiently trying to tell me to do) and it just sort of worked! Fiddly but worthwhile - even better was the young girl who cut my blank blade didn't charge me! Time for a coffee and a post up my other mods of today. David
-
Make a cuppa and have a biscuit and relax No the rubber tray is NOT re-used, it won't fit properly. The best way I found to reassemble is to hold the back half and then line up the keyblade, with button and spring inside, into position. You'll notice a little bit of the spring poking out sideways, which needs to "hook" onto the plastic nib in the seating hole. Once lined up and while still holding everything in position, turn the keyblade counterclockwise (one rotation is sufficient), this will build up the tension. Once done, while holding the whole thing together, line up with the other half (best when it's laying on the table). Whilst landing the back half onto the front half, slip out your finger that has been holding the button down. then just screw it all back together and voila, job done. Hope this helps Ok that has sorted out the flip blade gubbins -cheers! Now will try and get the circuit board to fit! David
-
Am struggling (gasps of shock!) with this! Firstly I can't get the circuit board seated so that both buttons actually work, I can get the top button to click but the bottom one just doesn't seem to meet the silver button on the circuit board. I assume the rubber "tray" from the original key case is NOT re-used? Secondly how the blazes does the flip blade/spring/button assembly go back together? It all pinged apart as I under the screws and never had a chance to see which bit was where! Had success with some other mods today though, so it hasn't been a total disaster - will post those later. A very frustrated David!
-
The DAS6 DA polisher with Menzerna compound is a pretty foolproof combination for starting off - if it worked for me it will work for anyone! Using a DA will give a much better finish than by hand as it works the compounds properly, allowing the particles to gradually breakdown and get rid of swirls, holograms etc without any worry about burning through the clear coat or colour coat. A DA (dual action) has a random orbit motion which ensures you can't overheat the clear/colour coat and "burn through". DON'T be tempted to use a rotary as your first machine - too easy to overdo it and strike through. Detailing world will give you endless hours of tips and processes to use - well worth taking some time to read through the relevant beginners threads. Be warned though this is a slippery slope as you experiment with different polishes, waxes, sealants, glazes etc. My preference after claying and using DA is to glaze with WetGlaze 2 then seal with Auto Finess BUT everyone will have their own preferences! I was sceptical until I tried it for the first time on my Trophy Blue ZT - the end result is just outstanding. Hopefully some decent weather at Easter weekend will let me treat the Zed to a deep detail. David
-
Presumably the circuit board etc fit securely/easily in the other half? Darn - if only I wasn't so impatient I could wait till mine arrives to find out!
-
Yup, regular key cutting shop. Best just take the blade only, because its difficult to fix the whole thing onto the cutting machine. Cheers- glad I have one on order! David
-
No problem in having the blade cut? Just used a regular key cutting shop? David
-
I ike that idea! I've just ordered one with the hope the key blade is strong and can be cut (not the end of the world if it isn't at the purchase price), I assume I could send you mine and you send me a suitable dipped/Nismo one (in return for a charge of course!). David
-
Flyboy-Mirror Auto Fold Module - GROUP BUY 2017
Tinyflier replied to flyboy's topic in Member Traders
I will check what batch yours was posted out in but I am fairly sure it went to the post office on Sat and should have been a 2nd class signed for delivery. There will be a label in my office somewhere with your post code and a tracking number on it. I will track it later and see where the post office thinks it is........... Checked the tracking and apparently your lying, the post office still have the parcel, so you cant possibly have received it today This will be interesting when i ask them for proof of delivery I must have slipped into a parallel universe and imagined it all... Hehehehe -
Flyboy-Mirror Auto Fold Module - GROUP BUY 2017
Tinyflier replied to flyboy's topic in Member Traders
Kit received today - many thanks - but this arrived in normal 2nd class post not recorded delivery. Doesn't make a difference to me - but if you paid for RD... The Post Office has ripped you off! Looks like a very neat piece of electronics... now need to contact a "repsonsbile adult" to supervise my ham fisted attempts to open up the door and fit this! David -
slightly differant in colour .....just swop out a uk cubby(black) for an import cubby(off black) and had to change all the facia trim and gear stick surround to keep it uniformed. Oh fffff...iddle sticks ...
-
All of that seems perfectly normal - UNLESS both yours and mine are misbehaving...! David
-
Are the retractable lid cubbys a direct swap for the non rectractable ones? David
-
Hmm do all these mods warrant a "Member Build" thread or shall I just bore everyone by posting here instead... Car (an 06 DE facelift) acquired September 2012. Mods to date; 1) Stubby aerial 2) B pillar carbon effect (Nismo) garnishes 3) Miltek exhaust 4) Berks HFCs 5) HKS air filter 6) Uprev remap 7) Fitted widescreen TomTom in upper cubby (near OEM look) 8) Painted rear strut cover (used Plastidip) 9) Carbon wrapped engine cover (hmmm - see below) 10) Carbon effect bonnet hydraulic struts (and removal of bonnet stay) 11) Rear parking sensors 12) Cargo net in boot 13) Rear upper tonneau shelf/shield 14) Boot divider under rear strut brace 15) Thicker/luxury rear boot carpet 16) Handbrake leather gaiter [Yikes - it's only when you sit and ponder for a few moments that you realise how all these little bits and pieces add up to what is clearly severe "Zeditis".] David -
-
That's the way to do it ... here's the same on Gunmetal Oh no... can I resist...that looks lurverly... <sigh> add it to my list of Zeditis items to be considered/done... David
-
Does Sheffield Uni have a Car club? if yes amd sure one of the spanner geeks in the club would help your son out for a couple of beers - worked for my daughter when she was at Bournemouth Uni! David
