

cs2000
-
Posts
2,628 -
Joined
-
Last visited
Content Type
Profiles
Forums
Events
Gallery
Store
Everything posted by cs2000
-
Did you even read this thread?? Group buy was organised, discount was arranged (with a minimum of 10 orders) and everyone got their stuff, GB is now closed and there is no on-going discount.
-
Have had to stop my Waxyboxes for now, finding a lack of time to do a proper detail with new products, its much faster to stick to my usual routine as I can do it with my eyes closed. Still miss the cool products but still, no point spending money if im not using the products.
-
In for the win, this looks fantastic I don't know why I need a shiny bonnet catch, but I do damnit! 1:rickdon 2:OllyB 3:james monk 4:Fluke 5:Cal 6:J4M3S 7:Hell presidente 8:Tinyflier 9:briggsybriggs 10: cs2000
-

Keyfob not working, had to manually unlock today
cs2000 replied to Brettster's topic in 350Z General
Having owned the car for about 16 months, mine has seemingly lost the remote once before. Tried the car in 3 different locations to rule out radio interference, ended up just doing the pedal dance to erase and re-add the two keys I have and its been fine since then, seemed she didn't like the sudden bout of hot weather we had a few weeks ago. Id suggest a quick swap of the key battery followed by a re-sync as above, there's a guide on the forum somewhere. -
Small thread revival on this, but I had a windscreen chip fixed at the weekend, I asked the guy about it. He said he has done windscreen replacements on Zeds before and the trim is purely cosmetic, it isn't a weather seal. He said that mostly, the window replacement guys pull them out, which stretches them, and then they just cut them "back to size" when they refit. Of course, over time this then re-shrinks to its standard size and you're left with a non fitting strip, like mine. Need to find a replacement really. Its easy to remove, just give it a pull, its a tongue and groove fitment.
-
Yep. Dartford toll bridge desperately needs something like this! stupid queues!
-
Just to clarify here mate, all UK 350z's have HID lights as standard, there's nothing stupid about them.
-
As above really, it will be drop links or gamma arms. The drop links are much much cheaper than the banana arm though, so try those first
-
Ohh, that looks very nice.me want !
-
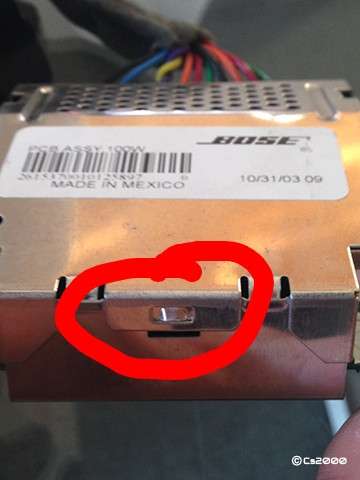
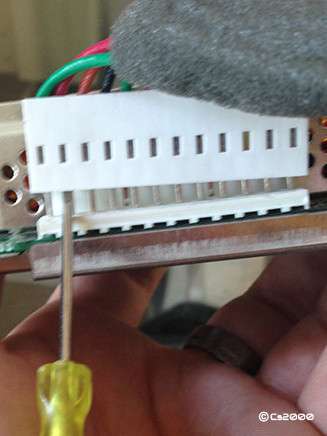
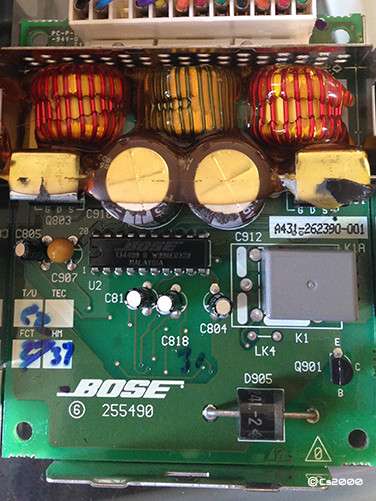
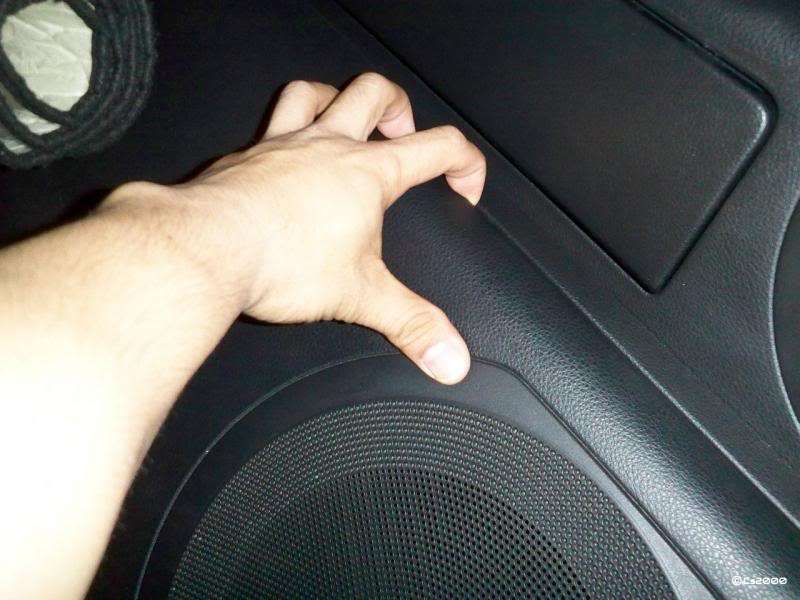
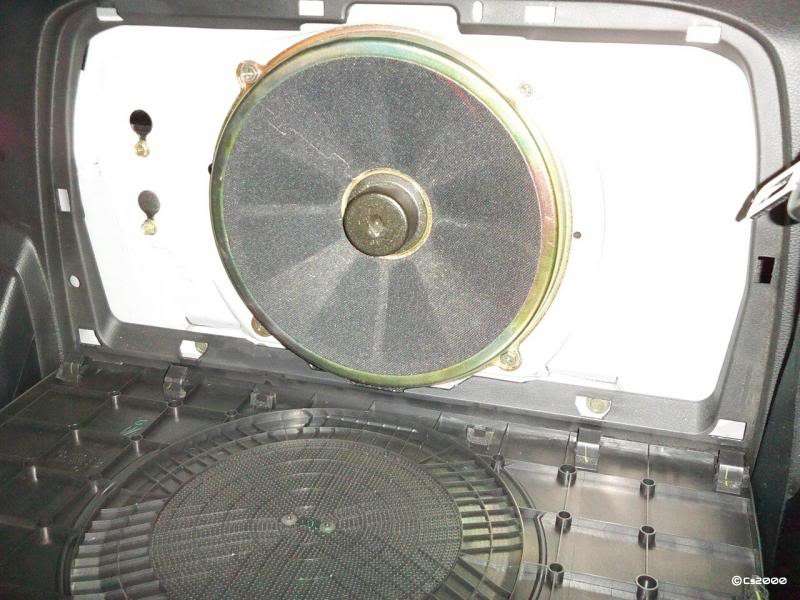
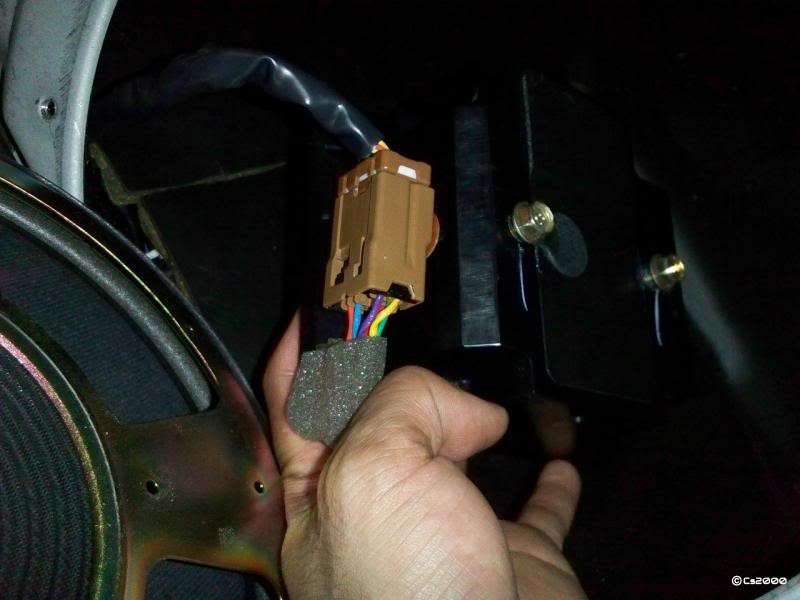
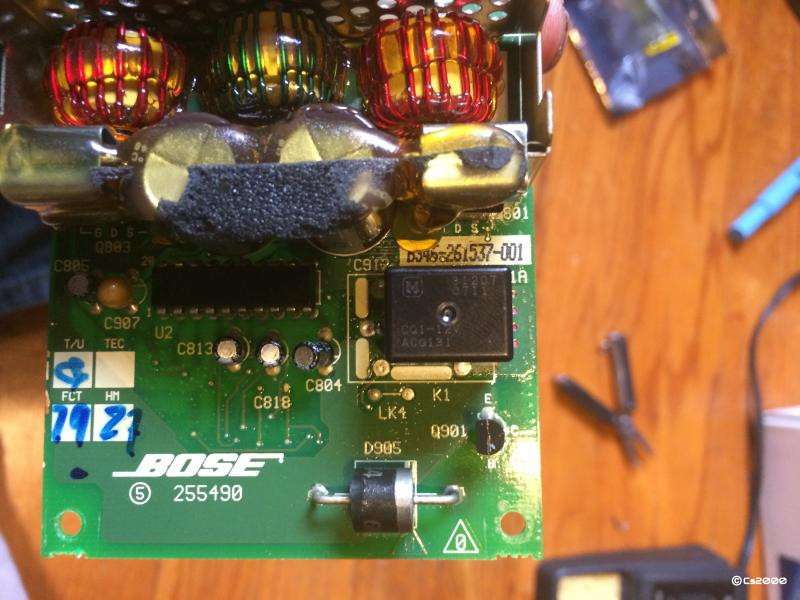
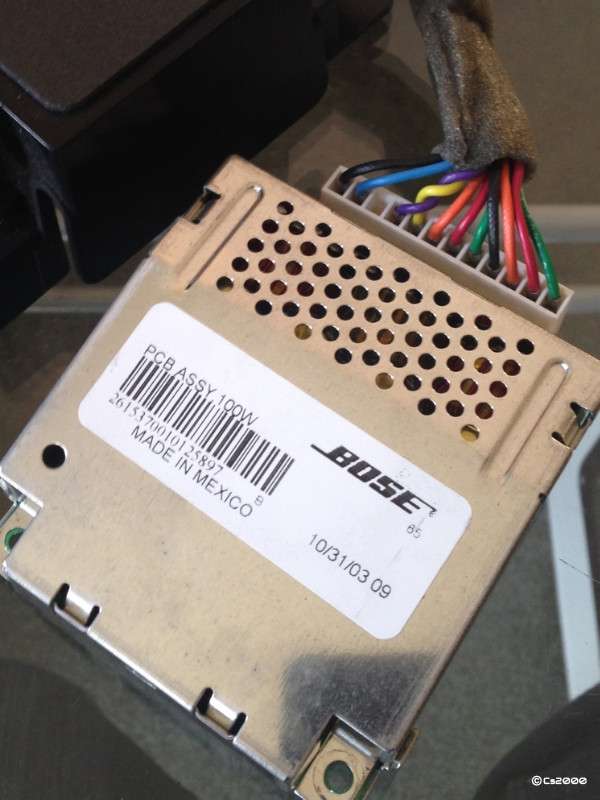
Hey all, due to another members query about how they could fix their amp as the bose sub was cutting out, I did some digging and found the relay part you need to replace, below is a guide which will show you how to firstly remove the amp, and also the part you need to replace, along with two places you can currently buy a correct part. Tools & Supplies Needed: - Small flathead screwdriver - 10mm socket wrench - Soldering Iron - Solder - Replacement Relay (links are below) - De-soldering Wick (Optional, but makes it much easier) Step 0 (Purchase the relay): The relay can be purchased from two locations in the UK. These are listed below. Farnell (£1.74, but minimum order value of £20.00) - http://uk.farnell.com/multicomp/mccma51-s-dc12v-c/relay-spdt-12vdc-20a/dp/2008759 eBay (£3.73 with no minimum order quantity) - https://www.ebay.co.uk/itm/171118849805 In-case these links go down, the relay part number is "MULTICOMP - MCCMA51-S-DC12V-C - RELAY, SPDT, 12VDC, 20A " Step 1 (Removing the subwoofer panel cover): Starting at the top edge of the panel, behind the driver's seat, carefully pry away the top section using the flathead. Be careful not to scratch the plastic. It should come out pretty easily as its retained using clips. Remove & set aside. Step 2 (Unmounting the subwoofer): Remove the 4 screws holding the subwoofer in place using the 10mm socket wrench. Carefully lift out the speaker and set aside. There is no need to unclip the wiring harness, just be careful as it is a little short. Step 3 (Remove the subwoofer amp): Loosen the 2 bolts holding the amp in place. Slide the amp up and out. Disconnect the wiring harness by inserting the flathead into the little groove on the harness. The amp should be loose now. Take this inside to do the electrical repair. Step 4 (Disassemble the subwoofer amp): Crack open the amp's casing, it should be held together by 4 screws on its under-side. Once these are removed you should be able to lift and remove the metal amp housing from its plastic shell, don't worry yet about its connecting wires. Next, again using the small screwdriver, lightly pry the metal lid from the rest of the metal case, a good place to start is the front retaining clip. as shown in the photo below, then do the sides and finally the lid should lever off. The lid is held down by a small seam of adhesive, so it will be tough. Release the PCB from its housing. Next, use a small flat bladed screwdriver to lever the plastic wiring block away from the main board. I found this to be the easiest way to remove this. Now you can see the offending component. Its this Relay on the right-hand side of the shown picture, yours will be a grey box about 1.5cm x 1.5cm Step 5 (Perform surgery on the amp): From the picture above, flip the board over and use your soldering iron to remove the old relay, you have to de-solder the points shown in red below. I personally didn't have any desoldering wick, so I broke apart the old relay, heated up each solder blob and used pliers to pull out the last metal legs of the old relay. I then re-heated the solder and inserted a pin through it to make holes for my new relay. Get your fresh relay and ensure you insert it correctly into the holes left by the old one. Solder this all in securely and fit back into the car to test. And relax! Picture below shows new black relay installed. You can do a similar fix by just cramming paper/card in-between the relay and the amp's casing, but eventually, even this will fail & for people like me who actually like the Bose system (despite its many many issues) a permanent fix like this isn't bad for a total cost of a couple of quid! If you really struggle, drop me a PM, I may be able to do this fix for you if you can post me your amp.


-
Better fix for Bose sub cutting out - replacing relay
cs2000 replied to Jimbo Mahoney's topic in I.C.E & Electronics
Fantastic. Ive now cursed myself, seems the hot weather has caused mine to break. Past few weeks its turned off 3 times. Need to get one of those relays ordered now! haha. EDIT: You can also buy these from Ebay currently from this link. 3x the cost of the item on Farnel, but if you don't meet their minimum order price of #20, the eBay link is cheaper anyway. http://www.ebay.co.uk/itm/like/390813571045?limghlpsr=true&hlpv=2&ops=true&viphx=1&hlpht=true&lpid=108&device=c&adtype=pla&crdt=0&ff3=1&ff11=ICEP3.0.0&ff12=67&ff13=80&ff14=108&ff19=0 -
Good stuff - thanks for the info Agreed, I've just started getting engine vibration at around 3000rpm when the revs are coming down, I was already suspecting the flywheel was dead so I now suspect it even more
-
http://www.350z-uk.com/topic/71866-350z-paint-colour-code-guide/ Always useful. The names given are the official 'Nissan' names for each colour too.
-
Mine has exactly the same 'problem' Its more of an annoyance than an actual problem however, never caused any issues.
-
WIll, you have made my cry. What the hell have we/the FIA done to F1
-
Yeah, creaking is generally the droplinks
-
Was there an option for a door light in the US market, it's the sort of thing they would have gone for. That's what I was wondering, and I agree. OP, best to check with ZLEDS regarding the connector. Im not too interested in them but would hate to see you order 10 sets of lights that wont fit UK cars. The connection design could have changed, but I think when it comes to wiring direct into the BCM, its a little too risky. EDIT: These were the ones, OK, they're from Clearcorners.com, but its the same principle, the company makes custom LED units for various cars so id presume the design is the same or similar. http://www.clearcorners.com/products/nissan/z33/i_door/
-
0 currently active, did have 3 previously for speeding, 36 in a 30. Not making excuses but was still slowing down from the dual carriageway 20 m before the 3 zone. Slightly annoyed that my license is clean, (has been over 4 years) but still have to declare them on my insurance.
-
Ive seen pictures of at least one version of the ZLed's kit and I don't understand how they connect. They come with about 25-30cm of wire, with a factory plug on the other end. It looks clearly designed to connect to a plug in the door, but, on UK cars at least, this plug isn't there.
-
Tarmac Sportz Vortech Supercharged GT86 Pics
cs2000 replied to Tarmac@TarmacSportz's topic in Other Cars
I don't understand the "not to everyones tastes" comment? This thing is stunning . Top work mate, looks amazing. I am surprised the respective tuning arms (TRD and WRX) didn't do a mental version of the BRZ/GT86. -
Correct, just follow the reset sequence in the guide. Will probably take you 4 or 5 tries as timing is VERY important with it.
-
A job I need to get done soon. Looks good timing though
- 1 reply
-
- 1
-

-
PM on its way mate
-
553bhp & 465 lb/ft 370Z Full Amuse with Greddy Twin Turbo
cs2000 replied to Adrian@TORQEN's topic in Member Build Projects
MG Rover Group Traction control... Im sure its a fine piece of kit, just surprised to see that name still going! -
GLWTS, but you may struggle selling rays at that price, even with the good rubber.
