cs2000
-
Posts
2,628 -
Joined
-
Last visited
Content Type
Profiles
Forums
Events
Gallery
Store
Everything posted by cs2000
-
Really glad to see your target has been smashed. Also, free bump
-
I was selling this cable pre-modified but I'm afraid its already gone. Glad you like the guide though.
-

[SOLD] InCarTec 29-674 Headunit Cable with Busters RCA Modification
cs2000 replied to cs2000's topic in 350z Parts For Sale
Matty, you have a PM. Elliot, Dibs have obviously gone to Matty but youre second if he should fall through, but, since I like wiring, if by chance you wanted to order the leads, get them sent to me, il do the mod for you and return it, your call. SOLD -
reduced sound out put after replacing o/e bose ?
cs2000 replied to buster's topic in I.C.E & Electronics
Just a FYI for anyone looking to do this. If you struggle to follow Busters instructions, I have now written a guide for this linked below. http://www.350z-uk.com/topic/107583-how-to-busters-rca-headunit-volume-fix-guide/ Remember, I just wrote the guide, Buster actually figured this out -
Hey all, for sale here is an extra lead I bought, purely so I could write a guide for the forum. The lead simply allows you to install a aftermarket headunit and keep your steering wheel controls. Most aftermarket headunits however suffer from a low volume issue when connected due to the RCA connectors on the 350Z, this can be resolved by following Busters hints as shown here http://www.350z-uk.com/topic/58947-reduced-sound-out-put-after-replacing-oe-bose/ I performed this mod on my car, but then thought it would be handy to write a proper guide, so I bought ANOTHER cable, did the mod, wrote the guide http://www.350z-uk.com/topic/107583-how-to-busters-rca-headunit-volume-fix-guide/ and am now selling this cable pre-modified as I cant fit 2 stereos in the car! haha. The cable has been tested and all works, you just need to plug in a few connectors and away you go! New stereo with nice loud volume! The sale also includes the InCarTec 29-025 universal patch lead. This comes with comprehensive instructions and all the required bits to create the cable you need to allow the steering wheel controls to be connected into your new headunit. Its compatible with basically all brands on the market, including generic Chinese headhunts from the likes of eBay. The RRP of the cables come to £39.00 + Delivery, these are brand new, never been fitted and pre-modified so you don't have to do it so I'm asking for £35.00 including delivery. I know its not much of a saving, but I'm still loosing a bit of money for something I did purely for the forum, and you're getting a cable you can just connect without any hassle. ANy questions, ask away. Dibs in the topic and not PM please.
-
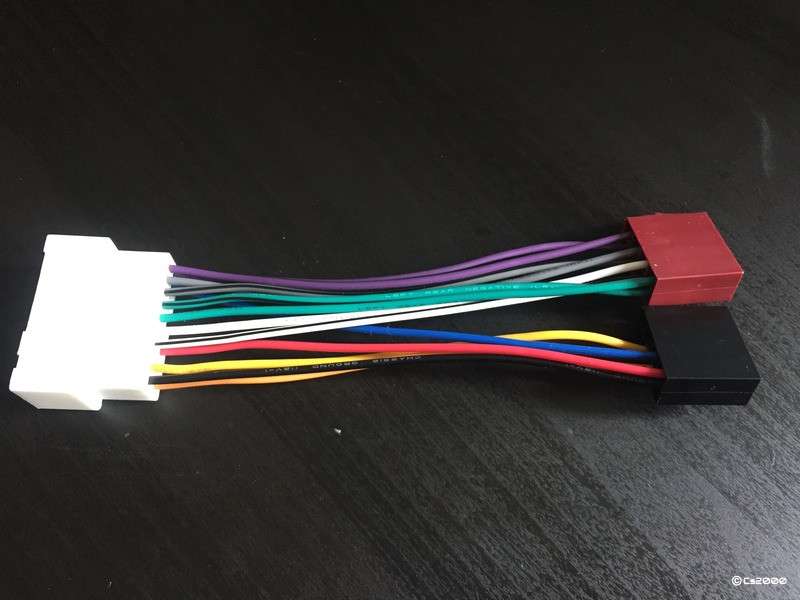
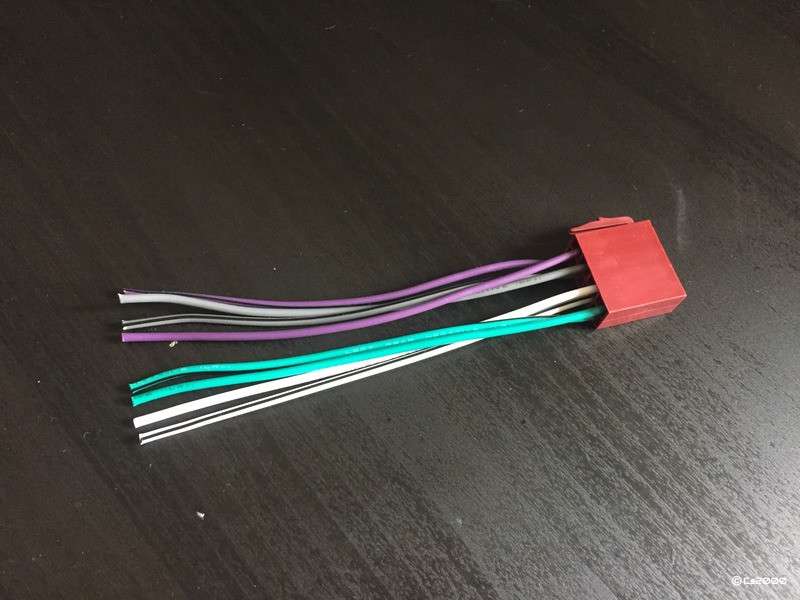
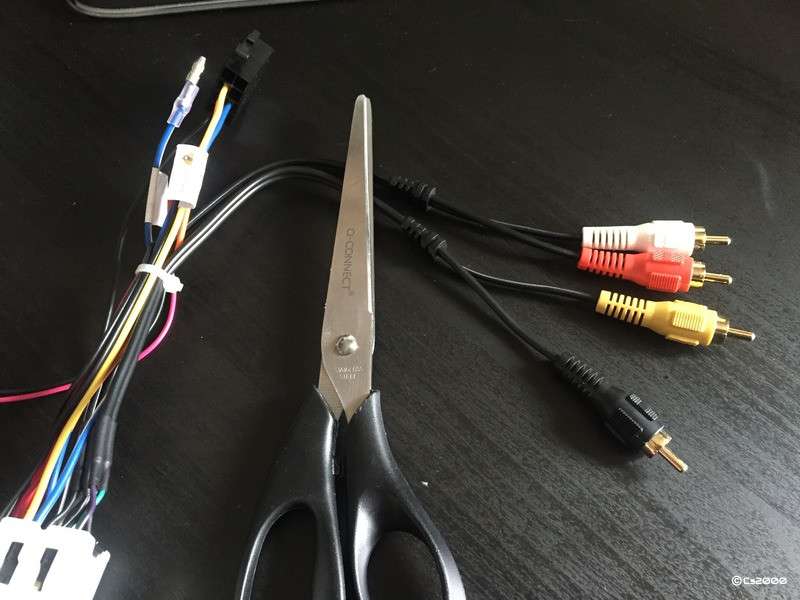
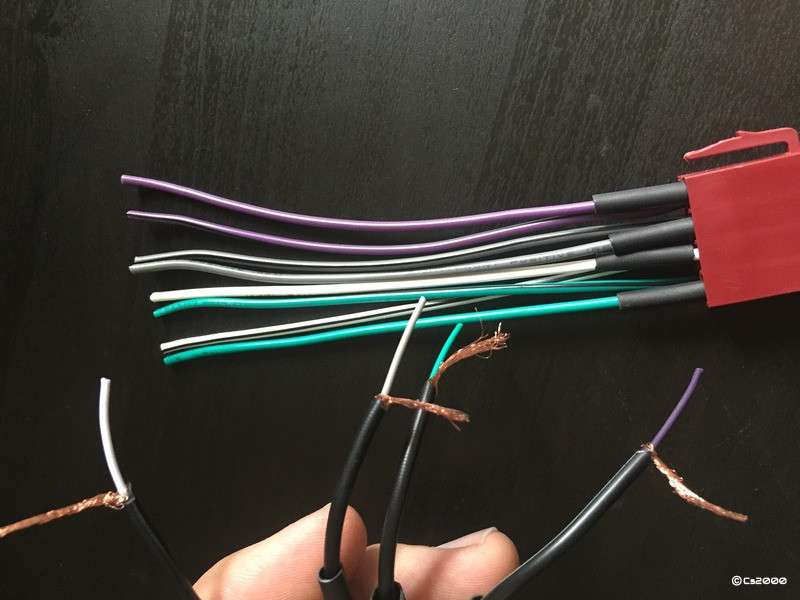
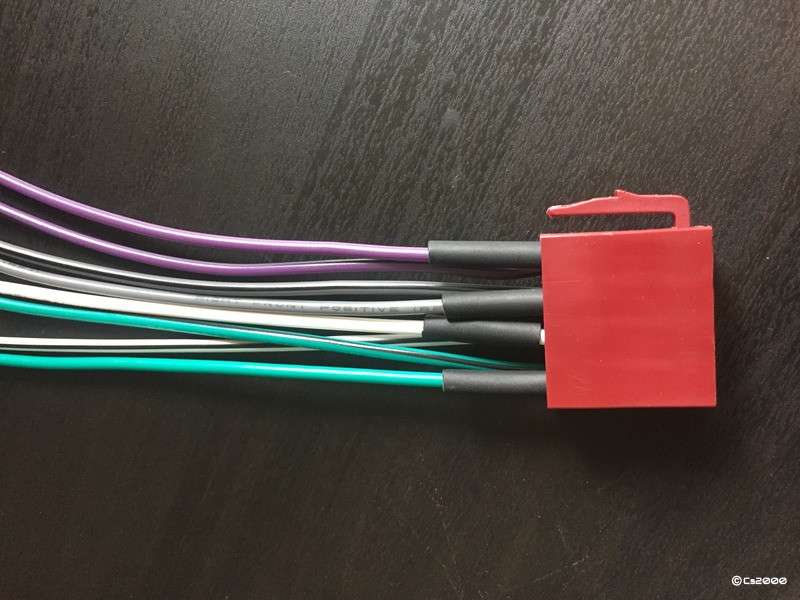
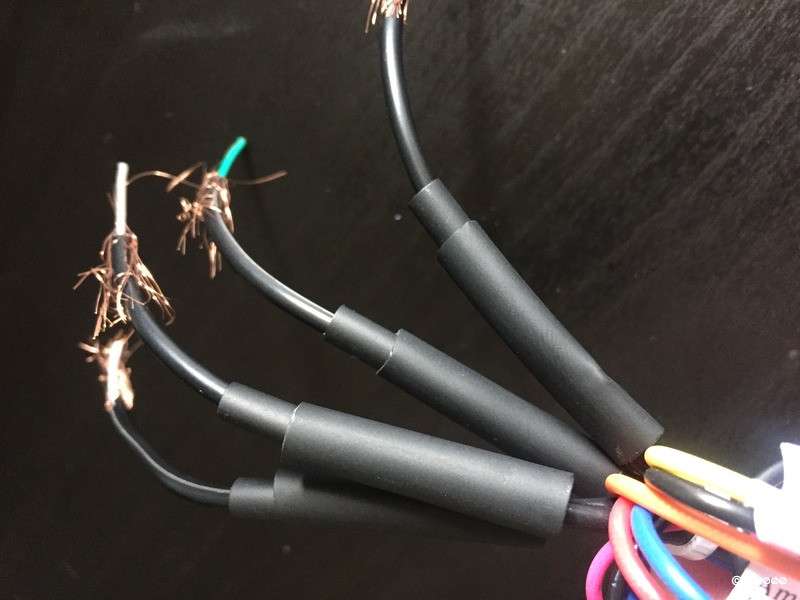
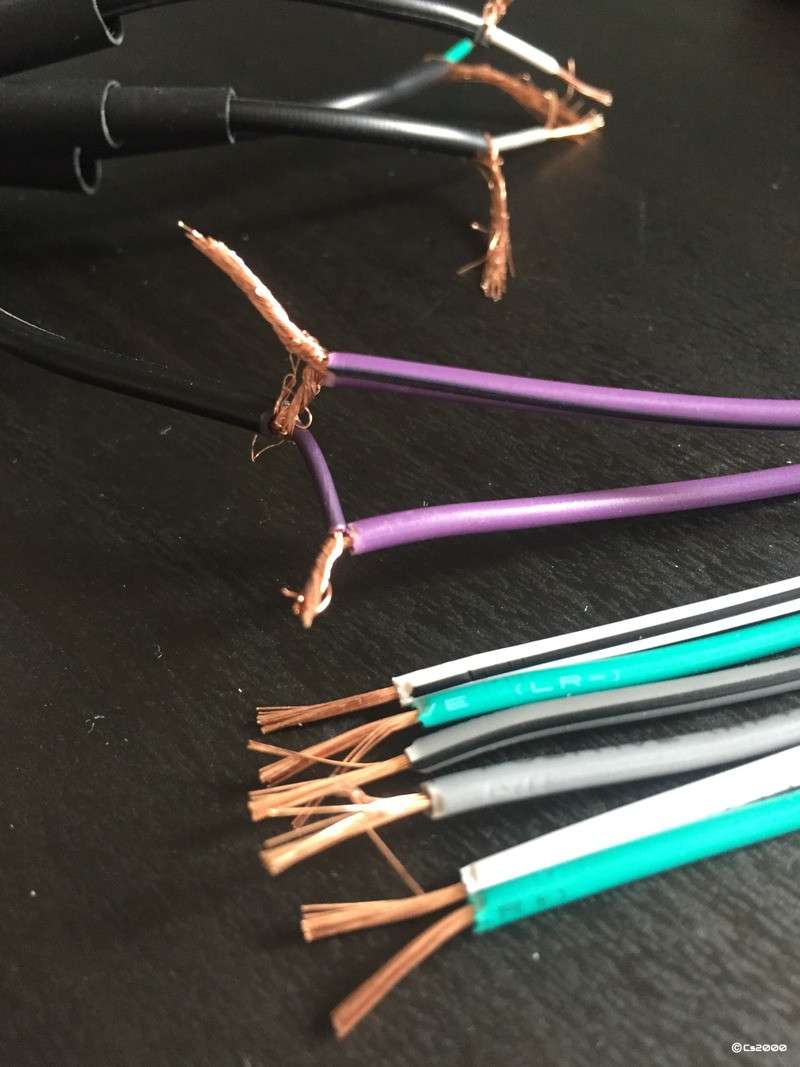
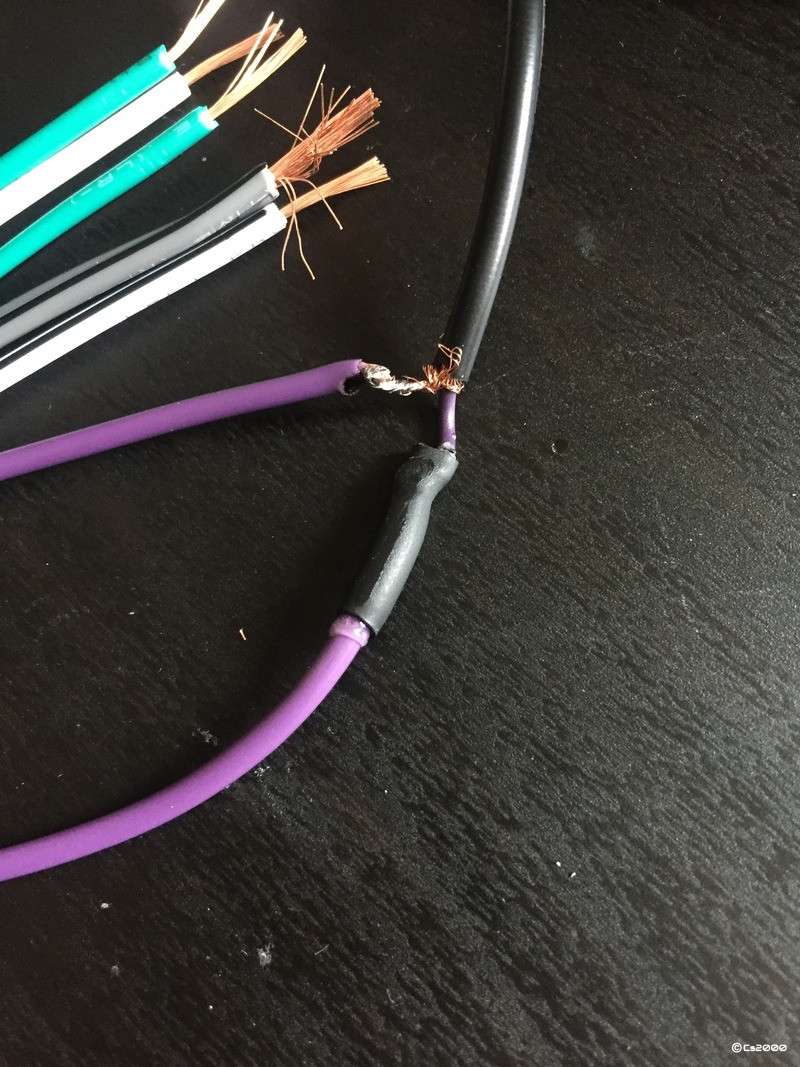
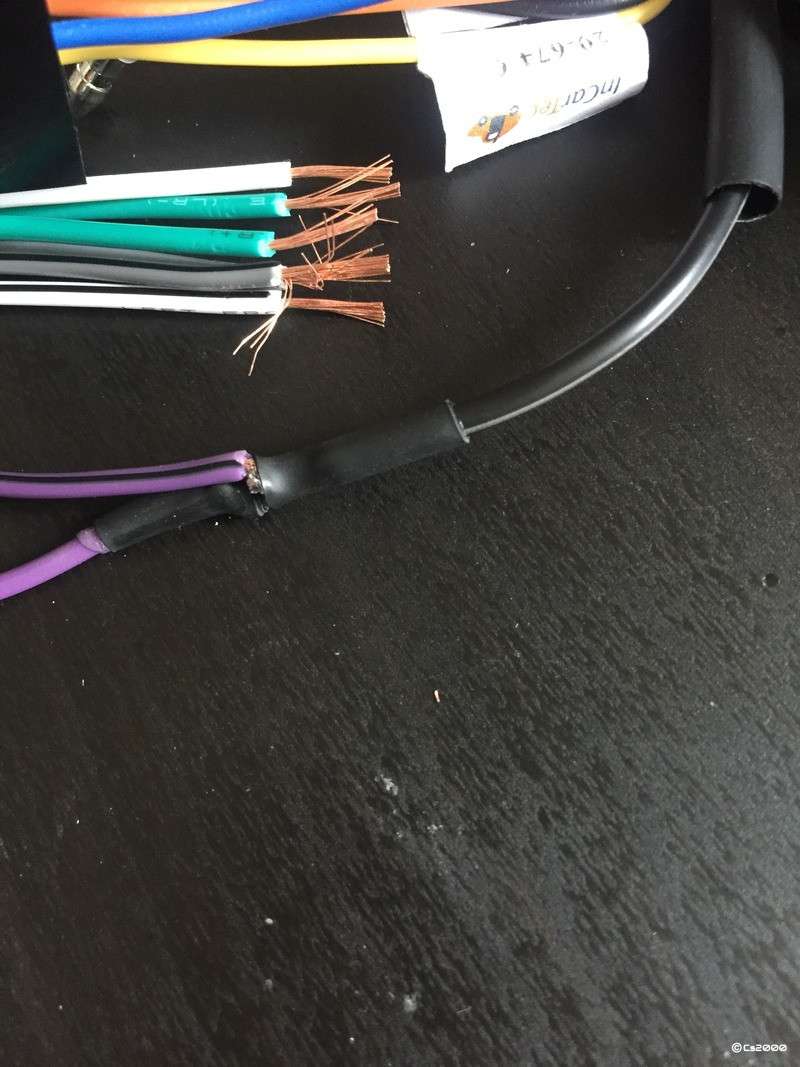
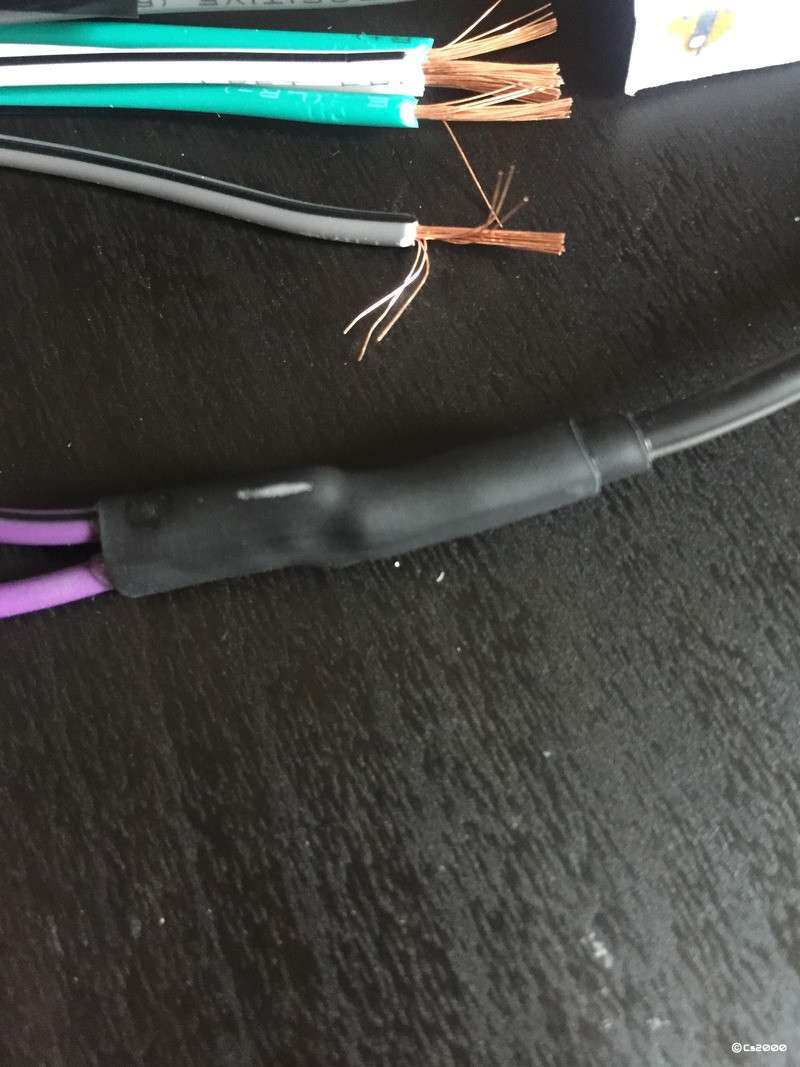
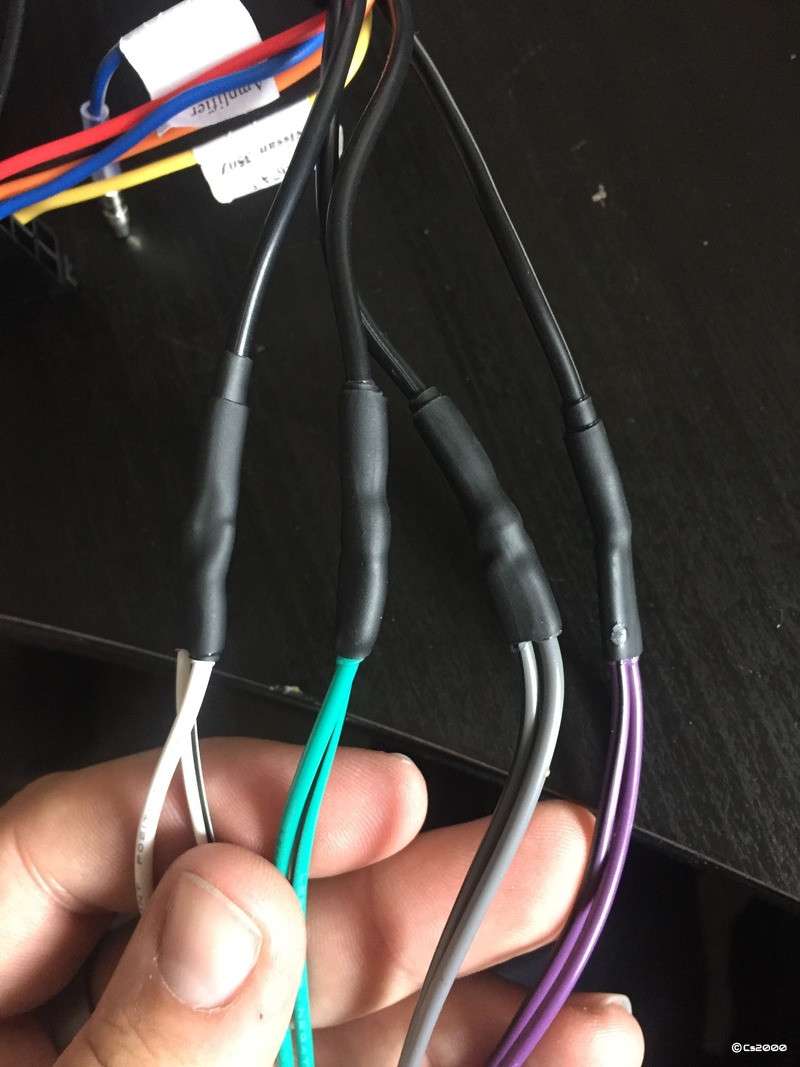
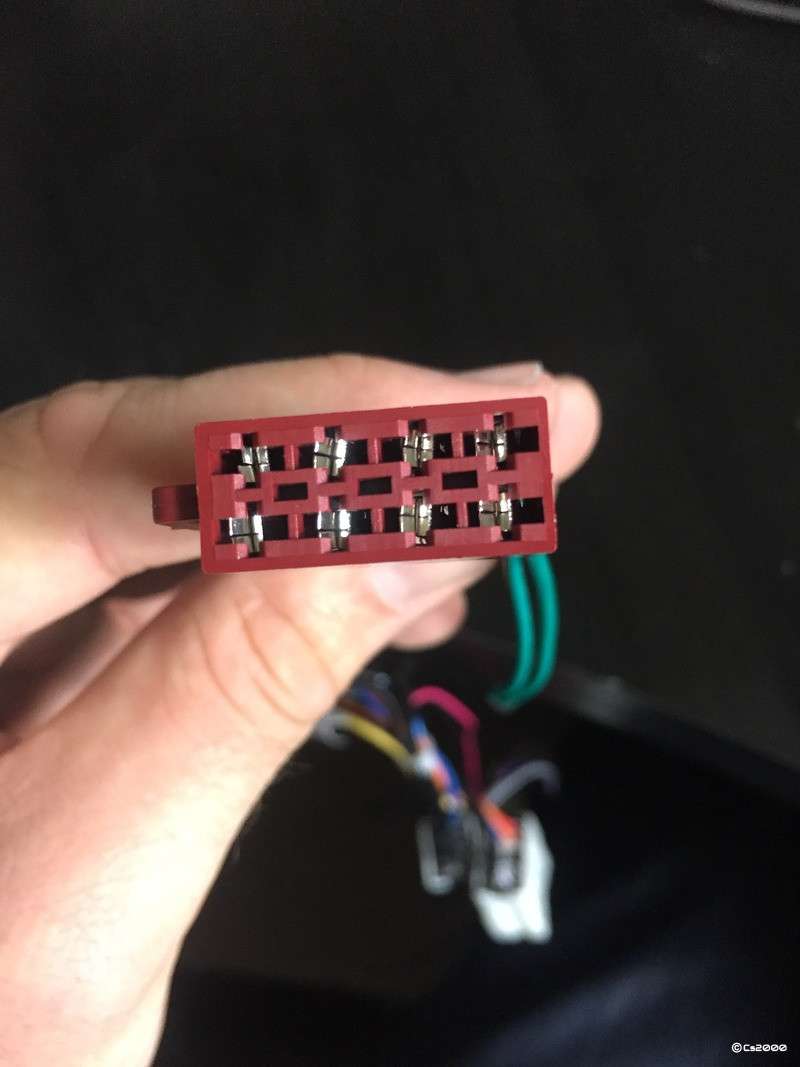
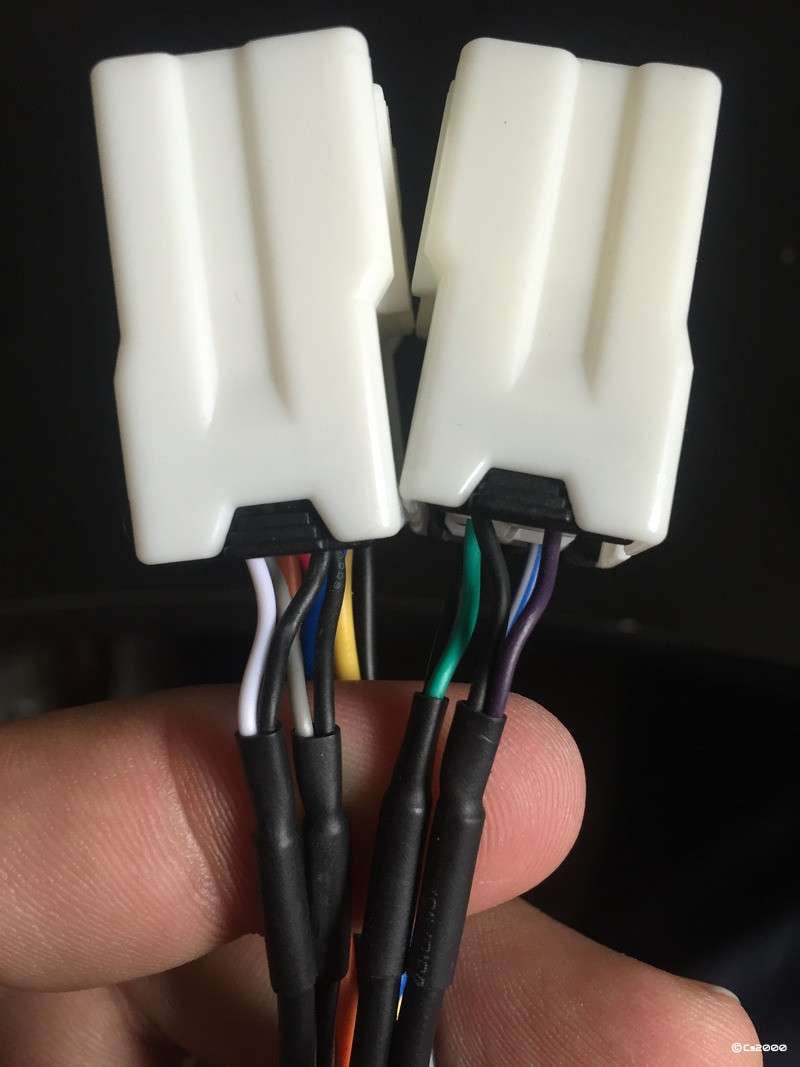
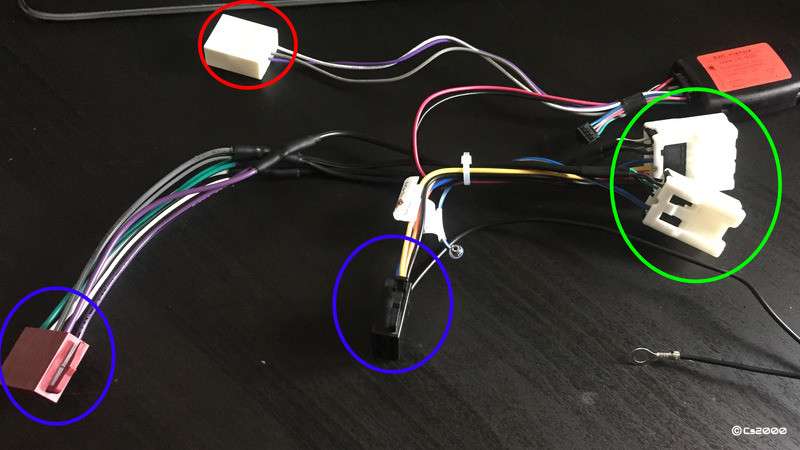
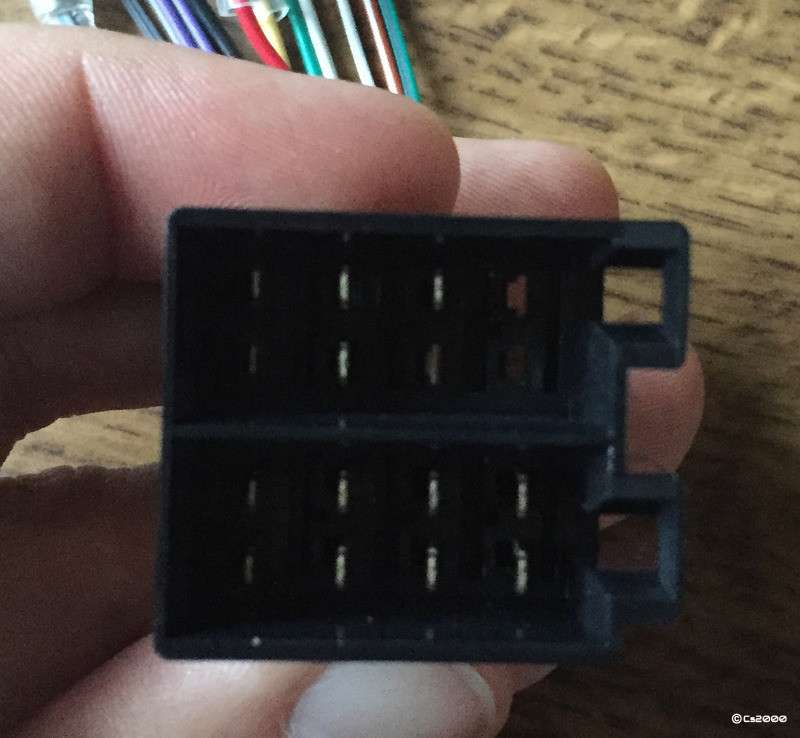
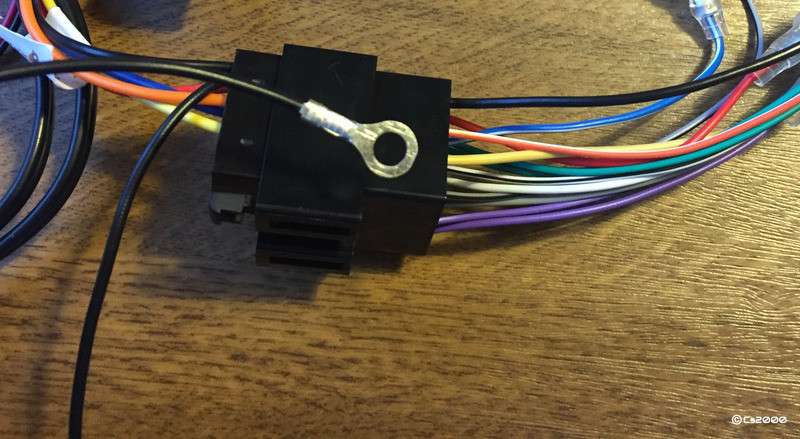
Hey all, I recently fitted a new headunit and was aware of a low volume output issue that seems to affect most aftermarket headunits due to the Bose setup in the Z. I managed to figure out busters instructions for fixing this and have been running this setup in my car for a couple of week now with no issues at all, other have been running this for much much longer. Busters instructions aren't too good however and several members have been calling for a 'proper' guide, so here we go . I will say again, I did NOT figure this method out, the credit for this goes to Buster and his original topic viewable below, I am just writing up a guide for his method. I have made one small amendment however by adding in an extra connector which saves you hacking into your new headunits harness. http://www.350z-uk.com/topic/58947-reduced-sound-out-put-after-replacing-oe-bose/ Parts & Tools Required 1x Autoleads PC2-76-4 Nissan 350Z 2003 - 2006 Car Stereo ISO Harness Adaptor Lead £3.85 http://www.ebay.co.uk/itm/261373114757 1 x Nissan 350z Bose Steering control interface - (29-674) £34.99 https://incartec.co.uk/Pages/Product.aspx?P=2975 Soldering Iron & Solder Heat shrink in 2.4mm, 3.2mm and 4.8mm widths with 3:1 shrink ratio Scissors Wire Strippers Multimeter (Optional but recommended) Hack 'n' Slash OK, firstly, grab hold of your Autoleads PC2-76-4 adaptor cable. This is the type of cable used on cars that don't have the bose system, but for our use, we will just be stealing the brown speaker connector. All we need on this is the brown connector and its associated leads. If you look at the writing on the side of them, you will notice each one is printed with a speaker such as "Left Front Pos" and "Left Front Neg". Take your scissors and cut this off. Discard the other piece, just keep this bit. http://i.dankdronedownloader.com/uploads/2020-08/5MZDMb.jpeg Next, grab the InCarTec 29-674 lead and your scissors and cut off the RCA connectors below the gland as shown here. Preparation OK, enough cutting, now into something constructive. Strip the cable ends you have just cut on the InCarTec 29-674 cable, you will see a outside wire, some more insulation and an inside wire. Separate these so that all of the outside wires point off at 90 degrees, then strip the innards too. Now, get your 2.4mm heatshrink and cut 8 lengths of 1 cm, slide them over the wires on the brown connector you cut from the Autoleads PC2-76-4 connector as shown below. Next, grab the 3.2 and 4.8mm heatshrink, cut these into 4 lots 1cm and 2cm lengths respectively and slide these over the wires on the InCarTec 29-674 cable so one fits just inside the other as shown. You should now be able to see that the wire colours between the two harnesses actually match! Purple is Right Rear, Grey is Right Front, White is Left Front and Green is Left Rear. Constructing the Cable OK, so you now need to connect the first of the 8 leads together. Lets begin with purple. The purple lead with no stripe is the Positive connection for the speaker, you need to twist this together with the centre purple cable on the InCarTec 29-674 cable as shown in the bottom of this cable. Then twist the one with the black stripe to the wire that was wrapped around the outside of this purple cable, shown at the top here. Solder these together trying to use as little as you need, then use scissors to cut off the extra bits. When you have soldered these, we now need to insulate the positive and negative connections, so, slide the 2.4mm heatshrink up from the brown connector end over the positive connection you just soldered, heat this up and ensure it covers the joint. Next, slide down the 3.2mm heatshrink over the negative end as much as possible, this may be tight, but this bit isn't 100% essential. Lastly, slide over the larger 4.8mm bit to cover the entire lot up, you have now insulated the Pos from the Neg, and secured the whole lot together. Its a simple case of repeating this fro the other 3 wire colours so your cable looks like the below. Check Your Work!!! Your cable is now electrically connected, but id HEAVILLY advise you to check you have connected things properly. This is where your multimeter comes in, set this to continuity. If you grab the brown connector, you should see 8 pins at the end. Follow these back and you can easily tell which cable connects to which pin. The image below shows the two white connectors, on top of my finger you can see the pairs of cable (White & Black, Grey & Black, Green & Black, Purple & Black going left to right). These colours should match from end to end. I would advise you con connect your multimeter between these ends and check continuity between them. i.e, stick one end in the purple leads pin on the brown connector end, then touch the other end on the purple cable pin on the white connector, it should bleep to indicate there is a connection between the two ends. Then move to the black cable on the white connector, and the purple and black striped cable on the other end. Its hard to explain, but its simple with the cable infront of you! Completed Cable So, now your connections are completed, il just run through what goes where when you come to connect this up in your car. And here is the rear of the Bose headunit The Red circled cable is for the steering wheel controls. This plugs into the connector in the bottom left of the Bose photo. The two Green circles cables plug into the other two white connectors in the back of the Bose unit. These are TOTALLY different sizes, so you physically cannot plug these in wrong! The two Blue circled plugs connect to the corresponding plugs on your headunits harness adaptor, this will usually be a big black connector as shown below. You need to take care here as the brown block has all 8 pins, but the black one only has 5. This matches the pin count in the black block connector too (5 on the top and 8 on the bottom) That's it, your leads are now all connected and if you connect your headunit (and remember to connect the earth loop eyelet on the InCarTec connector!!!) you should have all functions and a nice loud volume! Any questions, ask away!
-
It will be fine. 6 and the 6s run the same OS with the same connector.
-
if I was you, id connect the bose back up to ensure everthing works and you havnt damaged anything, then read this guide and follow it to fit the new unit in http://www.350z-uk.com/topic/106961-350z-headunit-replacement-guide-with-links-to-parts/
-
Litchfield stage what?? Pfffttt, ...you need T1 ~ 2500HP Nissan GTR
cs2000 replied to GMballistic's topic in Other Cars
The guy clearly has very deep pockets, and has obviously done A LOT of work under the hood. Admittedly, they have probably been abused, but ive seen numerous gearboxes and diffs sat on the floor of Sly's garage from R35's with either no teeth left on them, smashed to bits or broken clean in two where the power of these vehicles just destroyed them, and these were all around 650bhp iirc. -
They should fit too, looks like banjo bolts rather than the factory method of attaching them, but they should still fit.
-
It looks like exactly the same module, which I expect it is, which is mildly irritating. However the module alone wont work without being wired in correctly, which is what I'm guessing is the bit Flyboy has sorted out. If it is indeed the case, I'm still not keen on the roughly 35.00 markup for the task of adding some bullet connectors and some scotch lok's, but that's not my decision to make. As I say, mine came second hand, but never used from BBK, and came with the instructions for the Z, every car will be different.
-
Sorry Mikey, too far away for me to assist. I'm making a trip to Abbey Motorsport on the 30th if that makes it any easier, id be more than happy to fit it for you if you wanted to meet me there?
-
Mine has done this twice in my 3 years of ownership. I don't know when they both started, or stopped, but one day the noise was there, and then stayed for a few days, then it just went with absolutely no warning. I checked all the suspects and never did find what it was. Not much help, but my Z is still hapilly plodding along... Mine didn't sound like the gold video you linked to, there was no metallic noise, but almost like a paddle moving through water, like an old fashioned steamboat type thing, only without the water noises, but that kind of flutter.
-
I'm going to be doing a guide on busters louder volume fix for this lead. I will also try and show which cables go where, but does my current newly written guide not help at all? It shows this exact loom with descriptions kinda on what connects to where, but TBH all the plugs are keyed, so you cant go wrong. http://www.350z-uk.com/topic/106961-350z-headunit-replacement-guide-with-links-to-parts/
-
Thanks for all the replied guys, am considering my options.
-
I'm going to go out on a limb here, Tarmac Sportz... thanks. could drop a link i cant find them at the moment I don't believe theyre available on his website, drop him a PM however, I know theyre available.
-
I'm going to go out on a limb here, Tarmac Sportz...
-
Yep, I agree to be honest, lets see what I can do. Love the wheels, just not the current state of the rears, the front are OK though right? (MOT and PC plod legality wise I mean)
-
Hey guys, so, as some of you may know, I have some new wheels. I was being a bit of a guinea pig, and the fitment is a TOUCH wrong, the tyres stiuck out of the arches, but I'm trying to find the best way around it. Below are photos of my predicament. Rear wheel taken from rear of car Rear wheel taken from above Front wheel taken from front of car Front Wheel taken from above As far as I can tell, my options are as follows; 1- Use some arch extensions. Not 100% sold on these due to the need for trimming if I decide to keep them black, or bonding and spraying if I want to have them blended in. 2- Have the arches flared by someone like Archenemy. Seems like a good option, but with the flare id need I will need to have all 4 arches resprayed as the paint wont survive the process. Plus reviews of flared arches are rather hit and miss. 3- Camber arms, but I'm unsure of the level of camber I would need would have a detriment to grip levels or indeed tyre wear, I'm not really sure how they work?? I will be having BC Coilovers fitted and a hunter hawkeye alignment done by abbey motorsport on the 29th if that helps at all? I'm looking for advice basically on the camber arms. Looking at the pictures, do you guys thing camber arms would solve the issue? I would think the rears need 2-3cm pulling back under the arches, and the fronts maybe 1cm if required at all, in not 100% sure. Any other advice/opinions of course will be welcomed.
-
Glad you all approve guys! I'm loving the wheels. I think next is some arch extensions. With the wheels being a bit of a trial, they stick out about 2-3cm at the tops. There's plenty of extra clearance on the callipers and the suspension strut, so a different offset would allow the the same size wheel without any issues as far as I can see, but hey-Ho, I knew I was a bit of a Guinea pig! I'm not keen on putting on excessive camber to correct this and am liking the track slag look the wide wheels with a little dish give, so this just carries on the theme! Thanks for the comment Matt, I almost sold the Z a few months ago, it was either sell it, or mod it, so glad I chose this route.
-
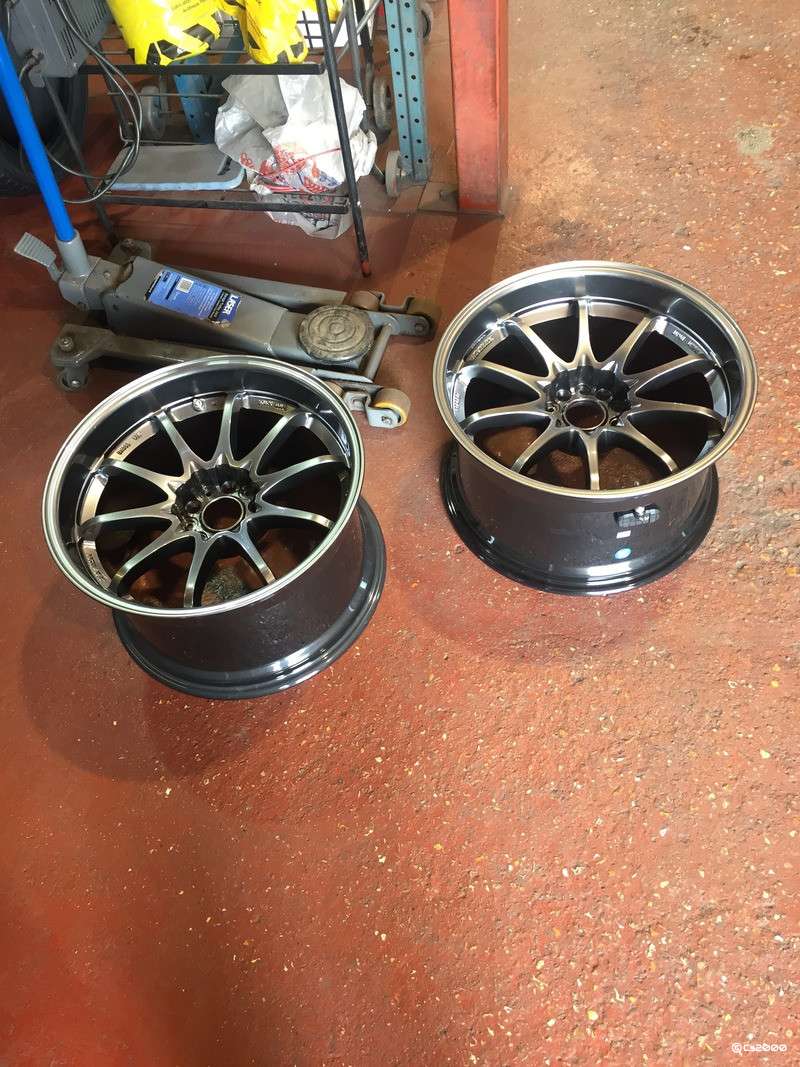
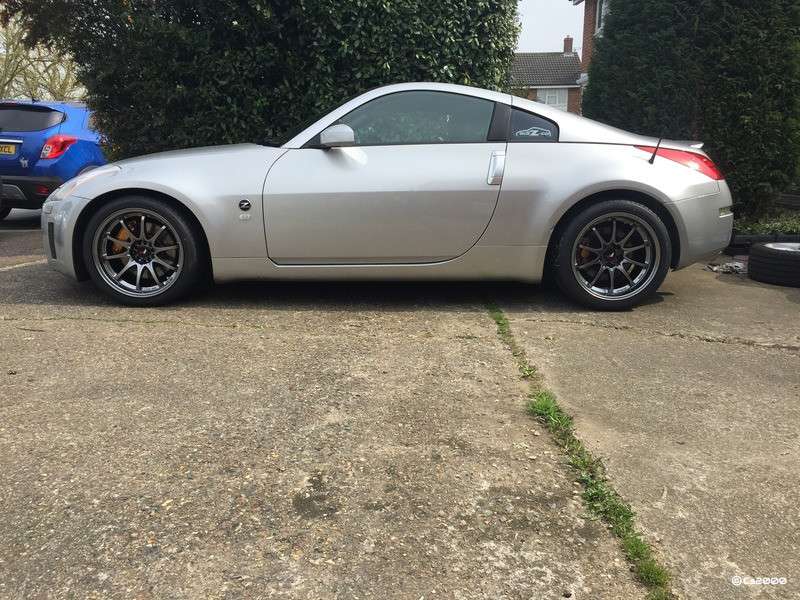
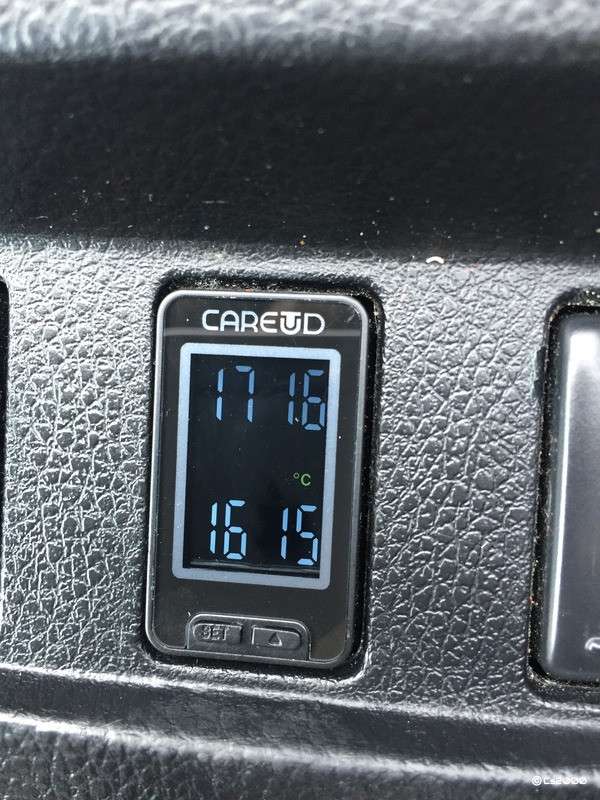
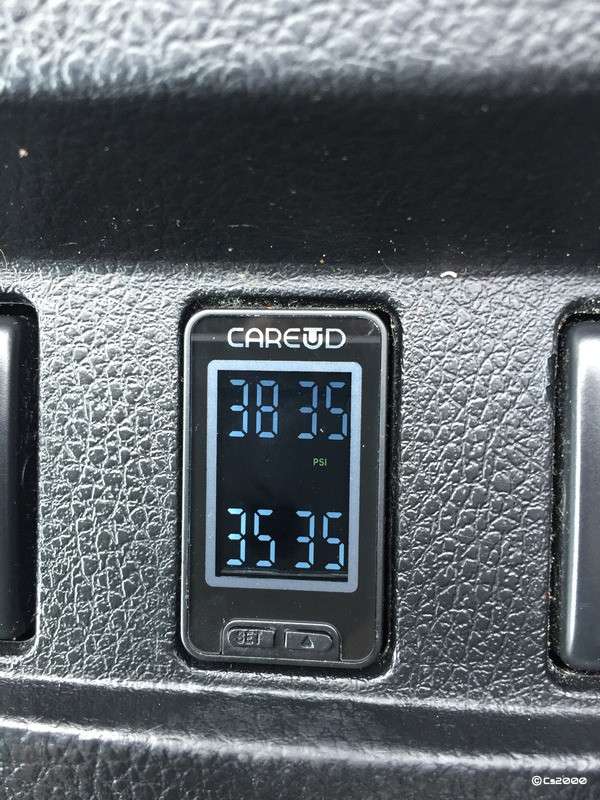
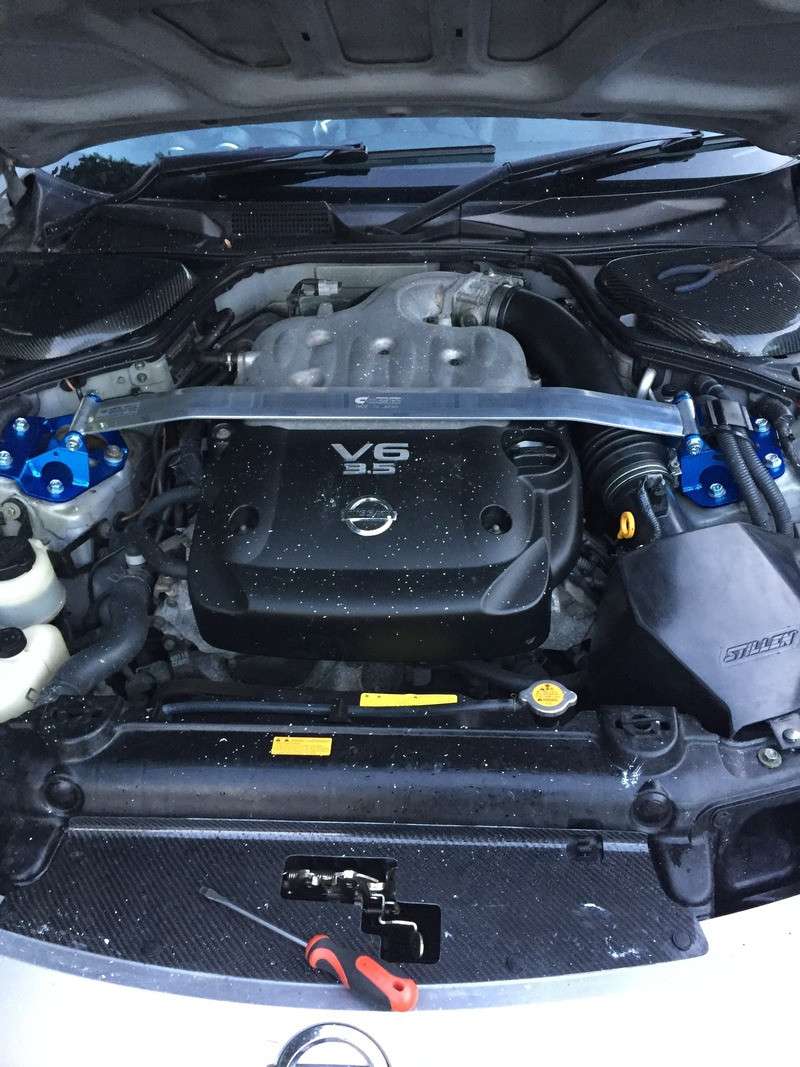
Thanks mate, glad someone is enjoying them. I haven't actually given it a proper run out yet, so I cant tell. Before-hand I had a generic ebay type popcharger on there (from the previous owner) but obviously there was no heat shroud. The Stillen one has a HUGE filter, easily 2x as big as my previous one, but it is surrounded by a flexible heat shield that also directs air in from the front inlet. The sound hasn't changed at all from the popcharger style filter, but I'm sure on a hot day, with a hot engine bay, that the shroud will help a lot with the air intake temps I know!!! That stuff is everywhere! All of the adjacent bushes are covered in white spots now. As I said in response to Davey, the sound hasn't changed from my generic popcharger style filter, which is a good thing. The Game changer for the sound will be the Berks HFC's and the Invidia N1... So, more updates! Today, a tiny UPS man knocked at my door with 2 huge freeking boxes, he struggles to lift them just due to the sheer dimensions of the things, and what was inside...Maybe this gives it away lol. Anyway, as far as I, and the manufacturers, JR Racing know, these are the only set of JR5's fitted to a 350z so I had to do a dry run of fitting them with no tyres to ensuire the offsets were correct and there would be no fouling issues, luckily, were spot on, plenty of fitment photos have been sent back to Chris at Tarmac Sports who has sourced basically all of these mods so far. I had to check a few garages that would fit my own tyres (Falken 453's) to the rims, but I found one in the end. He struggled quite a bit getting 35 profile tyres onto a 10' wide rim, but got there in the end by mounting them rear side first. I took a bit of time with the wheels off of the car to install the TPMS sensors that I spoke about in a previous post, and to wax the rims on all sides in an effort to try and keep them looking this new for as long as possible. Complete side view is below. The wheels are Japan Racing JRE 5's in Hyper Black. Essentially a copy of the Varistoen ES3's, but I only got copies as Varistoen aren't manufacturing these wheels anymore. Paintwork is spot on by the way, none of these horror storied you often hear about copies of wheels having terrible finishes. The TPMS sensor is showing the temps of each rim in this picture The sensors actually sleep as well, so when I fitted the wheels to the car, the system was showing temperature, but no pressure. After giving it a quick run up the road, within the first 5-10 metres the pressure values started to display. Looks like I need to drop the pressures slightly on all the wheels, especially the front left, but its a great little system that looks OEM thanks to the perfect fitment of the OLED screen.
-
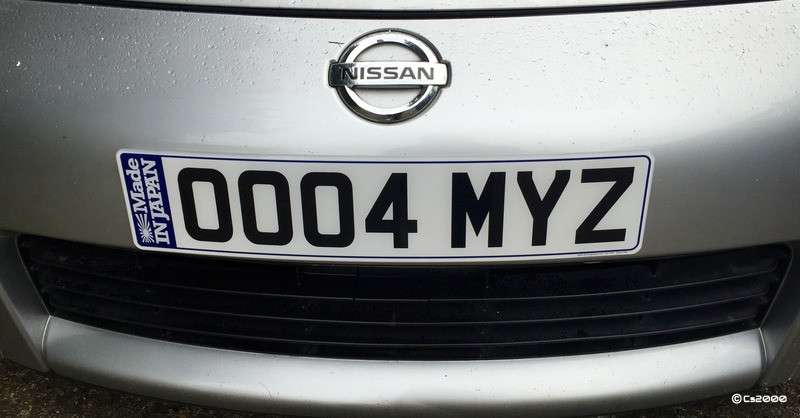
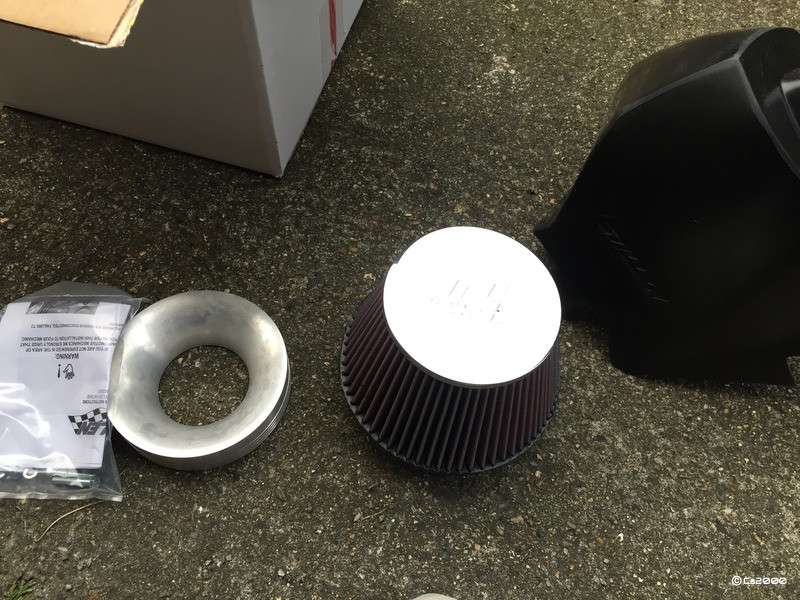
Again, a few quick small-ish mods today. Firstly, i finally caved into my partner who has a thing for custom number plates, so i am now the owner of this! Notice the little blue square to the left I know custom plates are often a marmite thing, but it made me smile when i stuck it on the car. Next was another box from Chris over at Tarmac Sportz, firstly was a Cusco strut brace which looking at the markings came straight from Japan which surely adds about 13 BHP right?? The other goodie in the box was a Stillen air intake, in the box you get a huge K&N filter, a 'Velocity stack', a pack of screws etc and the heat shield/air duct. Both were pretty easy to install and its unbelievable how lighter the Cusco brace is compared to the standard OEM one! Plus you don't have to tension the brace up so its easier to install and remove as necessary. I am also aware i mounted the Stillen air duct wrong, but i've fixed that now Please excuse the mess of white splatter everywhere, its spray from the polishing pad and polish from when i was doing my headlight refurb, this will be cleaned up during the cars upcoming detail (when i get some bloody time!) More next time....

-
Haha yeah, I did re-read the wiring instructions and was like "well, ive wired it right..." so I deduced the instructions must be wrong. Sorted it via trial and error but iirc, it was the first 2 leads you connect that were reversed in the instructions (grey and white possibly, cant remember), I just switched the bullet connectors and bob was indeed my uncle! Such a simple thing, but I do love this mod. Props to Flyboy for designing such a well engineered item too. It really does look and feel like an off the shelf item.
-
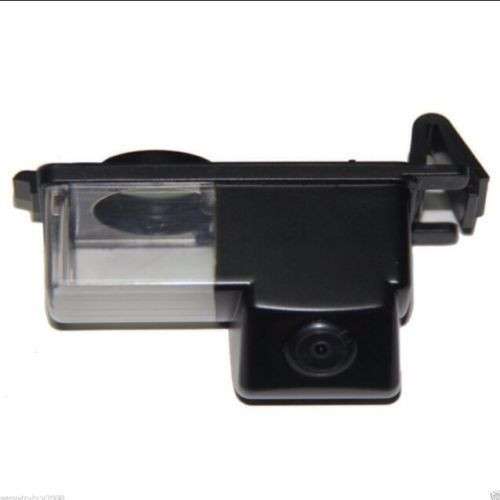
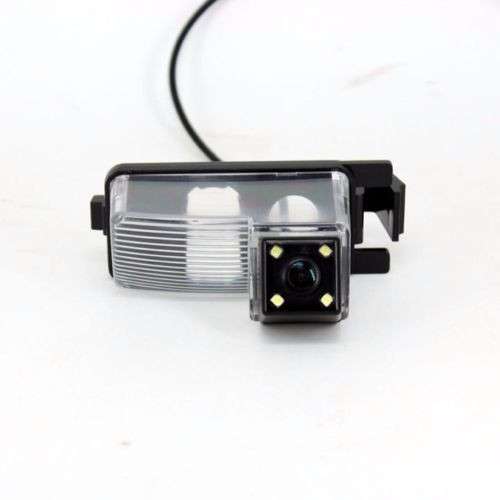
I applied the C1 and C2 today, so we shall see. I will have a look at the C4 stuff, thanks Just a little update this time around. Like many people, i have a reverse camera on the Z, its the one most of us have from eBay, looks exactly like this; This camera performed admirably in low light due to its CCD sensor (vs CMOS) but it does struggle (understandably!) in total darkness and its design means a lot of the number plate light gets blocked out, which has caused me to almost fail an MOT before until i showed the tester that the bulb was actually working. Plus, this camera has parking guidelines "hard coded" onto its image which annoy me for 2 reasons; 1 - My Pioneer head unit can digitally add them on. 2 - The guidelines are not correct due to the camera being mounted off-centre. The only one you can use is the red stop line, but the side lines are utter rubbish. With my headunit being able to digitally add the lines, which i can then adjust to better suit its mounting location, i wanted a replacement, and after a lot of searching, i found this. It looks very similar, but has two key advantages. Firstly, it has 4 small infra-red LED's. On my camera, these are actually black, not the yellow colour you see here. Secondly, the housing is mostly clear, meaning more number plate light gets out. It uses the same connectors as the other camera, so the swap out was literally unplug 2 connectors, unclip old camera, plug in new connectors, clip in new camera... The image quality so far is on par in the day but better at night, and the IR LED's whilst not any good for flooding an area, do help a lot with parking, which really is the main job of this camera! The angle of the lens does point it more towards the ground then the one it replaces however, but as a parking aid camera, that's not necessarily a bad thing. The camera is available below, at a cost of £12.99 upon my purchase. I believe the seller does two different kinds, one with, and one without the guidelines, so id heavily advise you send him a message after you purchase stating which one you want. I specifically requested the one with no guidelines. http://www.ebay.co.uk/itm/331749633571 So yes, IMO, a worthwhile upgrade to anyone who already has one of the other types of camera
-
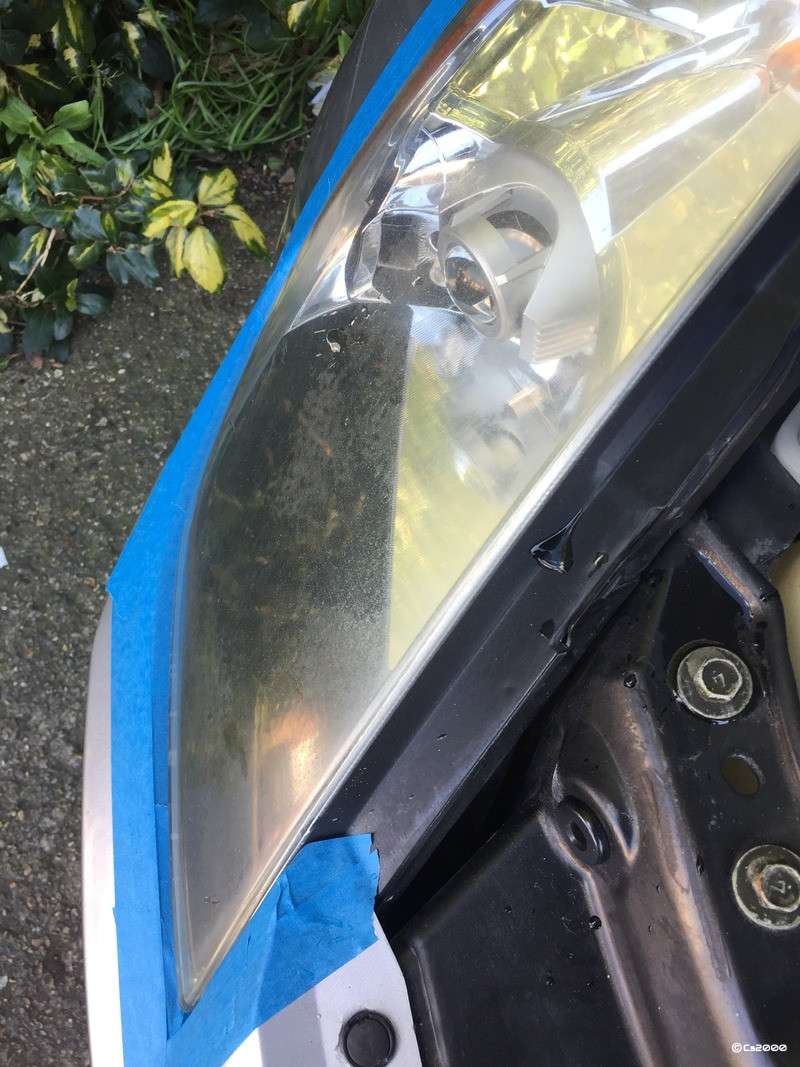
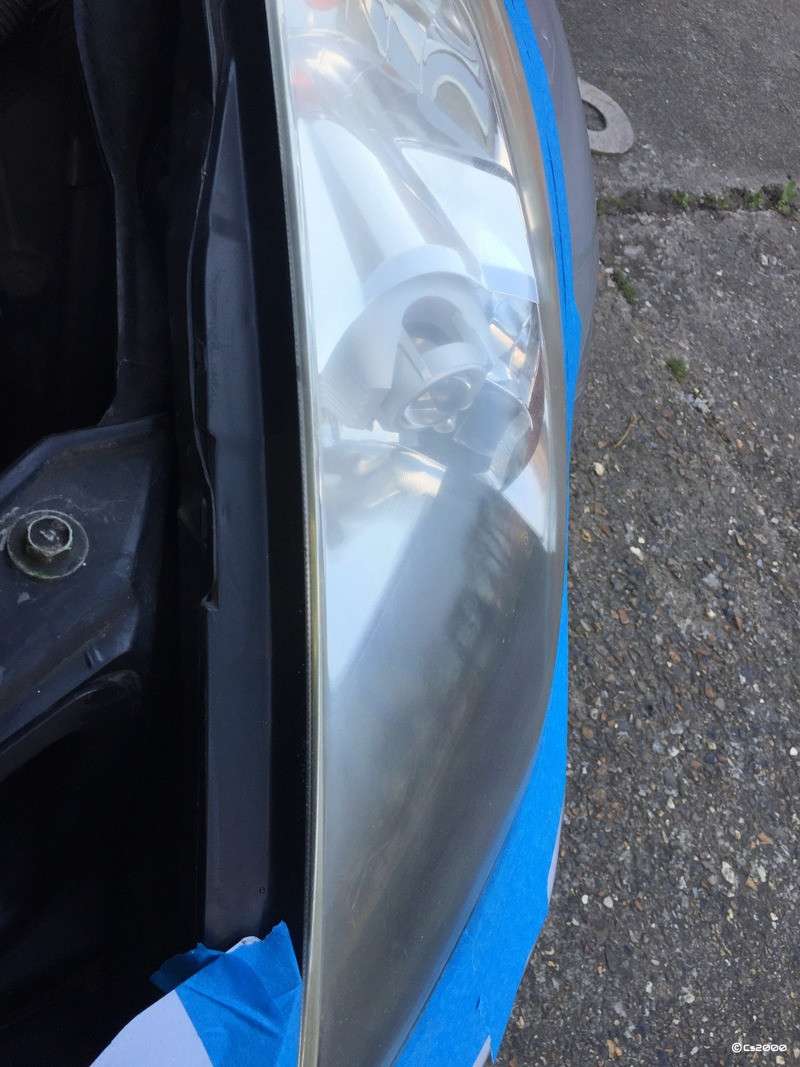
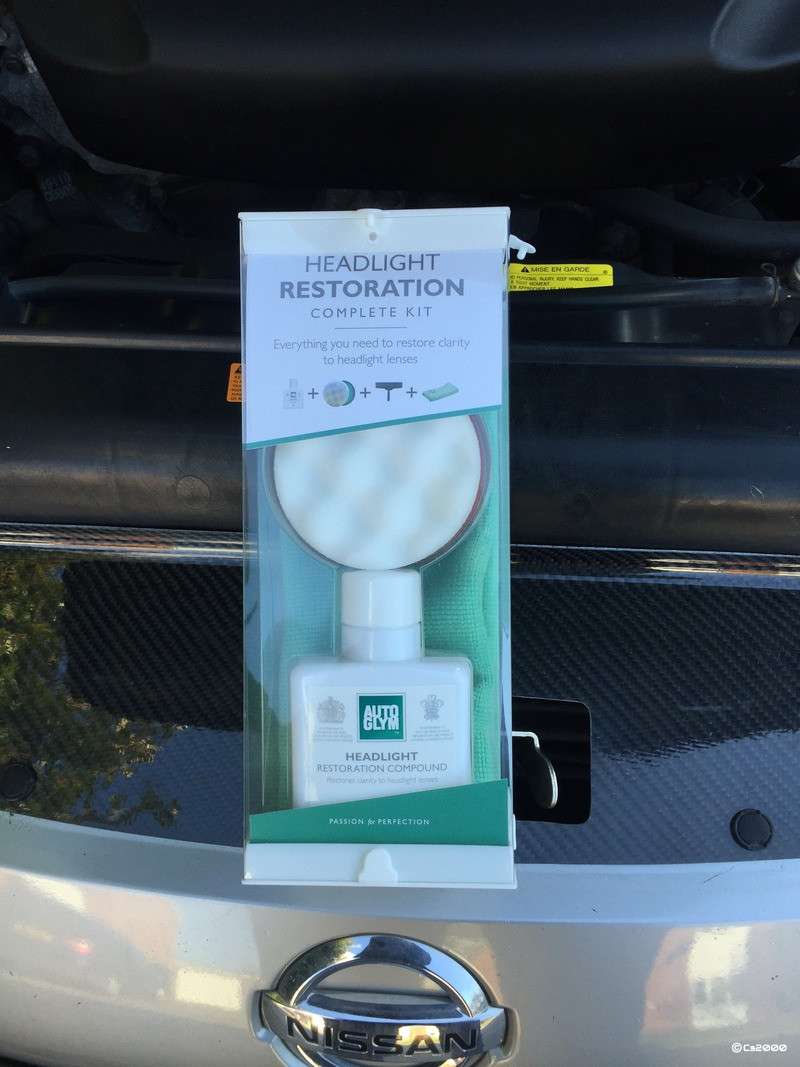
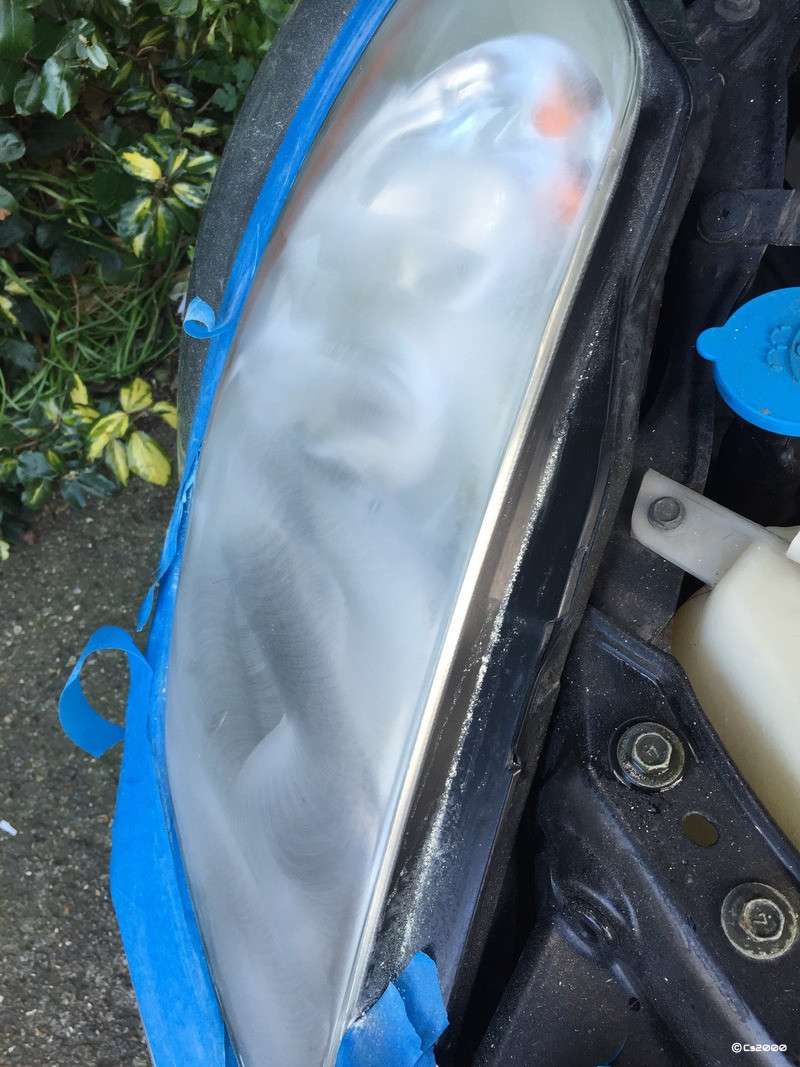
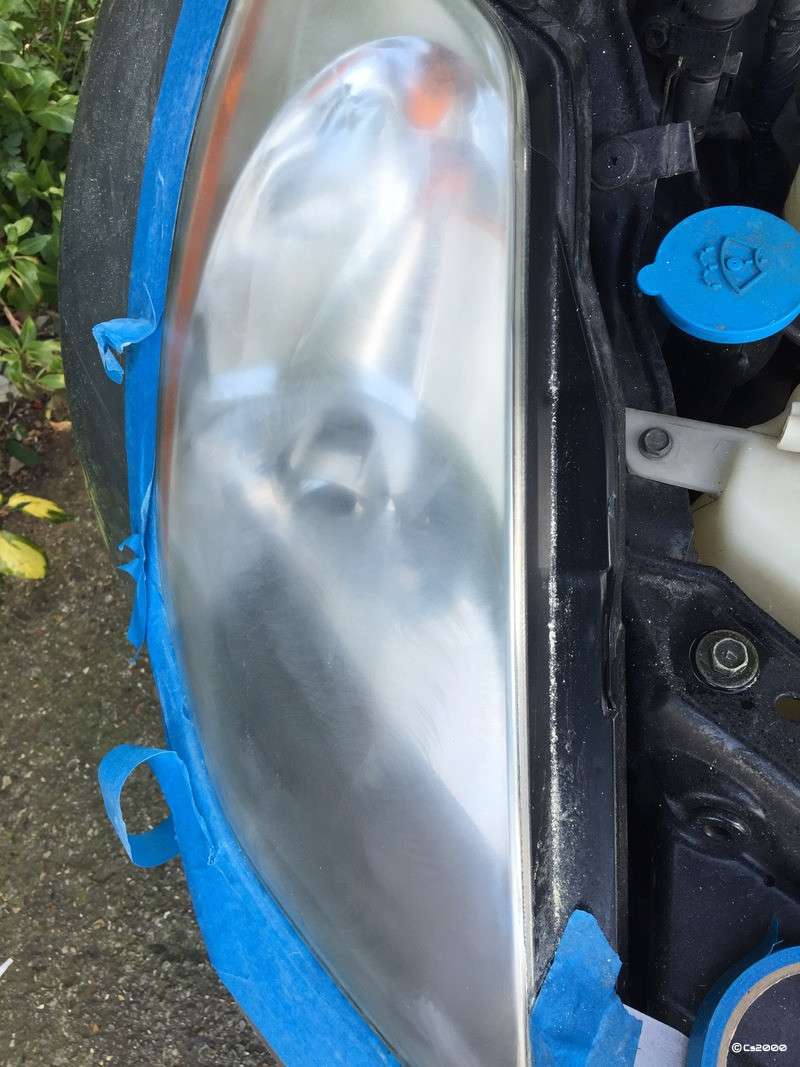
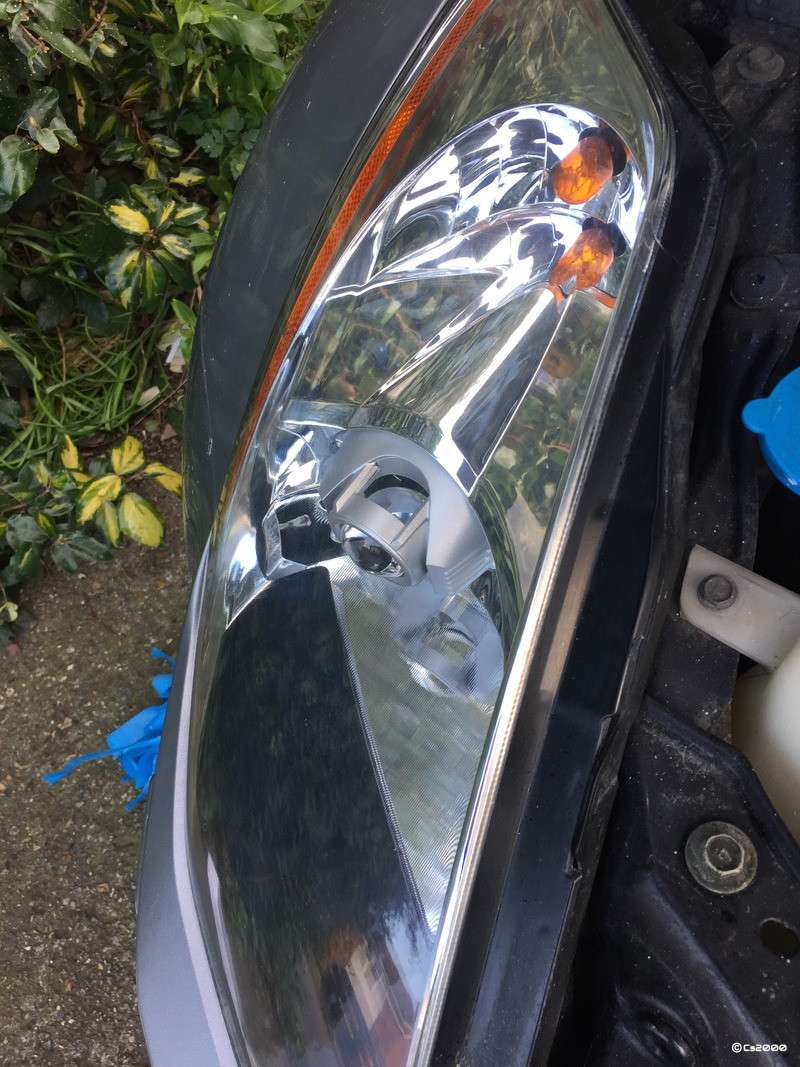
Today i thought id tackle the common issue of the dirty looking Zed lights. This as im sure we alkl know is caused by UV damaging the plastic lenses over time, mine currently look like this. I'm using the "AutoGlym Headlight Restoration Complete Kit" which came from Halfords for about £24.99 iirc. You need to start by applying a good 3-4 layers of automotive masking tape to the area around the lights as i have done above, so you don't damage your paintwork during the process. In my case, my Halfords sold this too, and it was blue. It has quite a low tack so doesn't leave any residue behind, and is water resistant. Essentially, its just a nice simple 3 stage process which uses velcro backed sanding discs and your cordless drill. This is the results after using the coarsest grit wheel Stage 2, not too much different, but much less 'scratchy' And then you have to use a stage 3 sanding pad, which i forgot to take photos of but it feels about as rough as a sheet of A4 paper! Lastly is a foam pad with some provided compound which works miracles! Granted, up-close you can still see marks so when my DA machine arrives i will spend a lot longer re-doing the polishing stage, but the damage to the lens has been cleared. You have now removed whatever was left of the factory UV coating, so you need to take extra care of the lights. In my case, i opted to buy the Gtechniq C1 and C2 Liquid Crystal Kit from Amazon for £39.99 http://www.amazon.co.uk/Gtechniq-Liquid-Crystal-30ml-100ml/dp/B004JNTVM2?ie=UTF8&psc=1&redirect=true&ref_=oh_aui_detailpage_o00_s00 I will be applying this in a few days. This, along with regular top-ups of wax and quick detailer should keep them crystal clear for a long while yet.