

cs2000
-
Posts
2,628 -
Joined
-
Last visited
Content Type
Profiles
Forums
Events
Gallery
Store
Everything posted by cs2000
-
Sorry mate somethings getting lost in translation... Essentially, you can connect these phono jacks to the back of your stereo, this is what the instructions, and common sense will tell you to do, this will work, but it will be quiet. I butcher up the lead MEANT for a non BOSE car as shown below, because id rather cut into a £2.75 lead, than into the wiring harness of my head unit which costs a lot more, and ties the headunit to the car because you've modified it to fit one vehicle. What this does is connect the BOSE amp in the boot to the high level speaker outputs on the rear of the headunit, rather then using the phono plugs which is different (low level). Yes you get sound out of them both, but theyre different voltages. This way, youre using the audio coming directly out of the headunit meant for non amplified cars/systems (as shown in lead in the picture above), and feeding it into an amplifier, which gets you more noise. Try it yourself if you want proof, the physical connections are NOT the same as before which seems to me to be what you're suggesting. The phono leads will (in 99% of cases) produce low volume, doing Busters mod/using my instructions will restore volume levels.
-
Yes it still applies, but you're a little mislead. Cars without the steering wheel control can still have a BOSE system. Essentially, if you have a BOSE system but NO steering wheel controls, you follow my guide, but you need this Autoleads adaptor, and NOT the one I linked to. https://incartec.co.uk/Pages/Product.aspx?P=3022 This is the exact same lead, but doesn't come with the wire and the black box I circled in red on my guide Or for an alternate view, the black box shown at the bottom of nanook's photo in the post above yours. If however yours doesn't have the BOSE system full stop, I'm afraid I cant advise yes or no as I haven't got any experience with that system. East way to tell, if you have the rear sub woofer, its a BOSE. The guide is a simple as it can be, and its probably a 30 min job to do it neatly, its really not all that hard so I wouldn't worry about it. @nanook - Glad you found the guide useful, I love a bit of wiring, found it really fun to make a plug and play adaptor like this without butchering something in the cars wiring harness. Means its 100% reversible.
-
What is it, looks like a pop rivet or something to me Thankfully it can (hopefully) be repaired!
-
Just seen this on the interwebs, apparently today is National Donuts day and Nissan celebrated by pulling this stunt! Looks very fun indeed! Sorry if repost did search but nothing was found!
- 1 reply
-
- 2
-

-
Yeah I wouldn't stick them on those wheels TBH. LMGT4's however, yes of course. I did also stick some on my JR11 wheels, but they're hyper black, so the sticker doesn't stand out, and it fits with my side stripes. At the end of the day though, its your car, do what makes you happy, you can always peel a sticker off
-
Just a small mod today, but one that involved about 2 hours of prep work. I got bored of the nasty looking upper plenum, but I didn't fancy having it polished because that's what everyone does, and also it will just corrode again unless you polish it every 25 minutes... Anyway I started by removing my cusco brace from the car, then removed all the plenum bolts. Then removed the plenum and also removed the throttle body from the plenum itself. Next, I attached the sandblaster attachment to the air compressor and set about removing the dirt and any oil etc from the plenum. Remember, use a proper filtration mask if you're using regular old sand (you don't want to wind up with silicosis!)and eye protection (I used a full face flip down visor) After it was clean, I then wiped it over with some bodyshop panel degreaser to ensure there was no sand left, and any bits I has missed were degreased Next, use some thick masking tape and cover up all of the bolt/screw holes, any of the little pipes that the rubber hoses clamp on to, and also the hole left from removing the throttle body. then broke out this. You don't actually need the high temp stuff, but i couldn't find any that wasn't, still, wont hurt. I followed some instructions I found online which contrary to usual painting instruct you to immediately apply 3 thick coats of paint diagonally, vertically and horizontally. Then you use a heat gun set to around 250c and use this on the paint. This does two things, it partly cures the paint, but the heat is required to achieve the wrinkle effect. The more you use the heat, the tighter the wrinkles are Leave it for about an hour, then you can gingerly re-install and let the paint finish curing on the car. After being heated by the heat gun, it should be touch dry in about an hour or so. Anyway, completed and re-installed. I prefer the look as it blends in more with the OEM engine cover Never got the front lip fitted, polyurethane parts are a nightmare, no idea how to fit this thing!!
-
Wow, Bournemouth is a hell of a long drive away, but that is a cracking deal, assuming that proper prep work is done and this isn't just a blow over type job, otherwise it wont stay looking good for that long.
-
This. Last time I had an MOT, I kicked up a fuss as they refused to honour my request not to stick it on the rollers. I later found that the section of the MOT manual that mentioned LSD cars should not be driven on brake rollers isn't in the new version of the testers manual. However, now its so low, it wont fit on the rollers, it would definitely get beached on the front end
-
I have these fitted to a 2004 UK Z, There is no issues with fitment, they were designed to fit the cars. Good quality as far as I'm concerned.
-
Personally, nothing I can think of, aside from the usual Z party trick of shearing bolts! Just make sure you lube them well before, should be relatively easy on a proper ramp! Good luck!
-
Agreed, my N1 needed an ASBO when it was first fitted!! Its still loud now mind, but it has softened a bit.
-

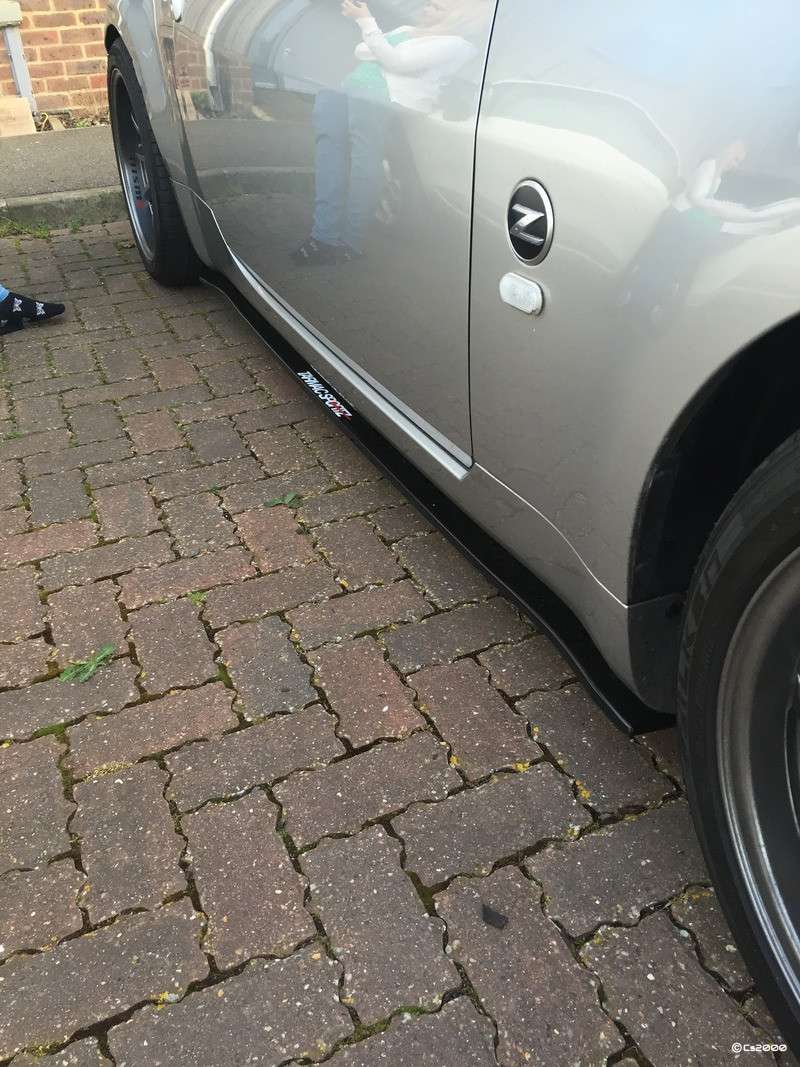
People with the Tarmac Sportz side splitters/diffusers
cs2000 replied to asianRobert's topic in Styling
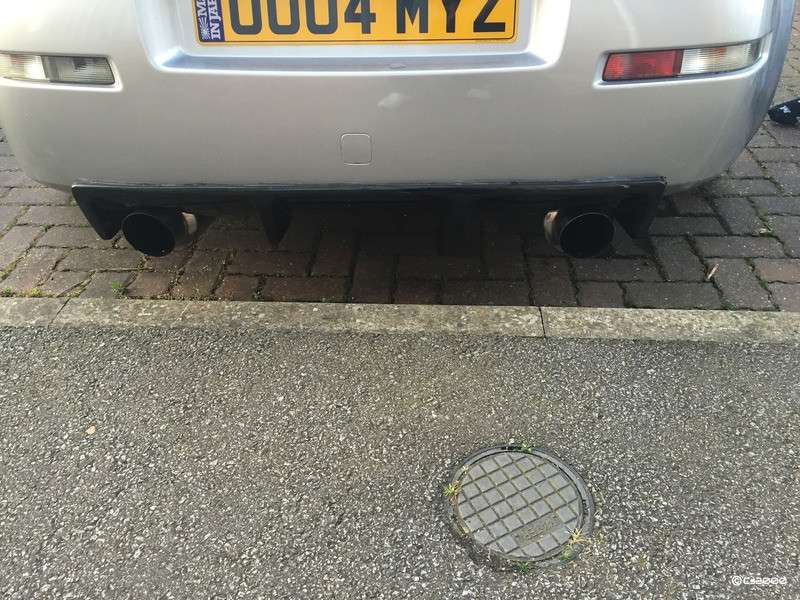
Is that the rear of the car? Yeah I just used some side cutter plyers and cut away the little bit that interferes with mounting that last screw. Not mentioned in the instructions however. You could just remove it, not 100% sure why its required TBH. -
Thanks mate Yeah I think they work very well together. I've not had one negative comment on the wheels so far so must be a good choice. The 10.5j wide rims in that offset caused me SOOOO much pain to get them to fit right, and a lot of expense, but worth it in the end. I would recommend the 9.5j wheels to anyone else though! They should just bolt straight on, may need some small spacers though, maybe 5-10mm
-
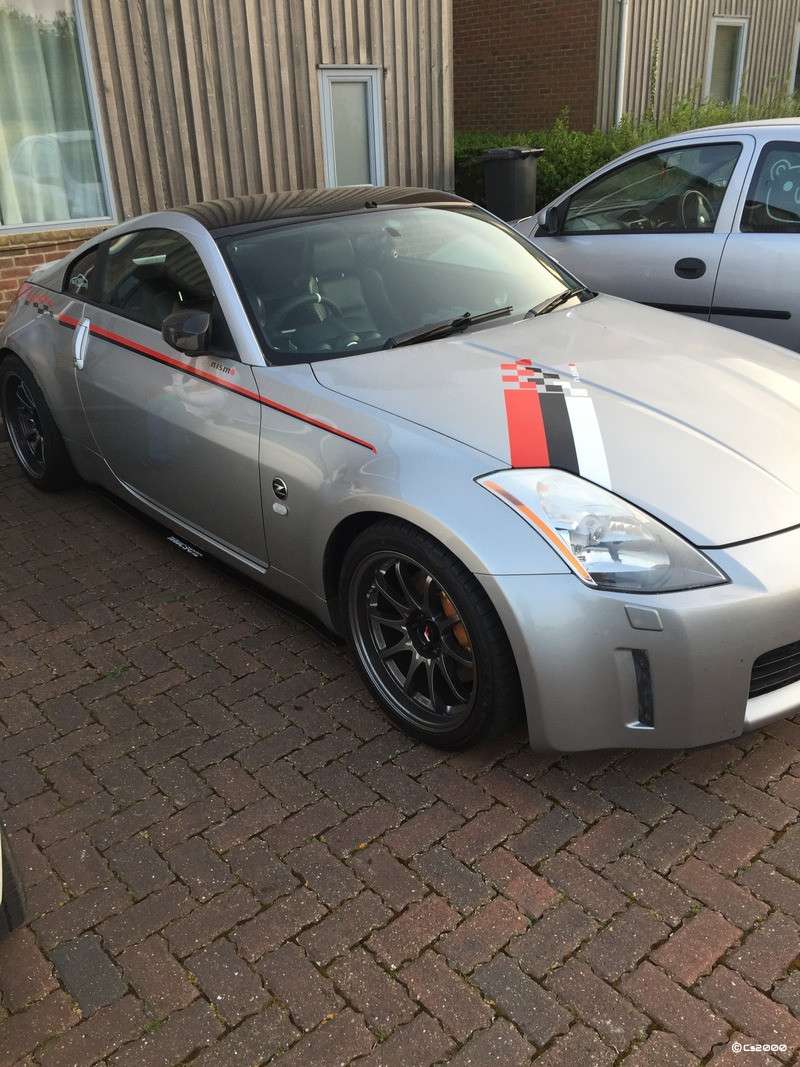
I love them, if they're done well. I don't know which cars had these on, but they're actually proper Nissan/Nismo items (mine are of course copies). I like the side stripes, just not 100% on the bonnet one... lol The car gets loads of looks now with the stripes and the exhaust I think causing most of them. The problem is, I don't know if they're thinking "nice car", or, "what an absolute tool" hahaha.
-
SO, after a bit of a delay due to other life things getting in the way, last weekend I managed to get a few bits installed Namely, this was the Tarmac Sportz side steps, and a rear diffuser. The instructions with Chris's side steps are spot on. YOu just need to drill 6(iirs) holes at set points along the steps which measurements are provided for, then unbolt these and fix them up! Next was the rear diffuser. I tried using tigerseal for this, but theres actually very little of this that contacts the car... I ended up using tiger seal around the edges (like you would silicone round the edges of a bath tub) and then two pop rivets in the centre element underneath the car which you cant see. Yes, its a crappy picture however. This bear in mind is teamed with the Invidia N1 exhaust. Word of warning, if you have to make ANY enlargements of the exhaust gaps on the standard bumper, this diffuser wont fit. The Invidia 100% fills out these factory made holes, and this JUST fit in place. Lastly, for now, I caved and bought some graphics. I'm not 100% sold on them TBF, maybe 80% sold, but regardless, I need to buy them again and have someone actually good apply them, there's bubbled etc up close! Guys, let me know what you think! (for those that don't know, its the Nismo side striped and bonnet stripe.) I do have some G35 rear spats which I'm trying to paint, and a front lip which I'm trying to find time to fit, its not as "plug and play" as all of the other parts, looks like its going to need some tender love from the heatgun, some pop rivets and some plain old luck to make it fit correctly. Not that this is a 'fault' of the part, or the manufacturer, its just a fact of life when typing to fit Urethane parts, especially complex shaped ones such as a lip. I'm thinking I may actually paint this item once fitted to the car. Just mask off well and all should be good, or I may not paint it, we shall see! More next time!
-
Wings and Wheels at Dunsfold 28th of August.
cs2000 replied to DDay's topic in National Events & Shows
Sorry guys, we have now had a large project come on at work so I cant get time off around here, freed up my spot for someone else. 1. DDay - CF54 VGL - Blue - parade. +1 2. Darkside- DK51 DEZ - GM - parade (If not too low) - +1 (maybe) 3. Rich260 4. Payco -PA04YCO - GM - Parade 5.Zippypooz - N44SSN - GM - Parade (if not too low) +1 maybe 6. terry06 - FX05 PVT- Yellow - parade +1 7. Chippychip123 - UK04 ZED - Brickyard Red 8. Edd20022 - GU56 AZO - Kuro Black - parade - +1 9. Dunks - PHZ 4136 - Sunset Orange - Parade (if not too low) +1 10. Pritchard 11.GizmoGold -G15MO V - Blue - +1 12.nismoandy - WP06 FNX - Silver - Parade (if not too low) 13.Rs200 -X5 HPL - GM - Parade 14. Jamez87 - vlz 9272 - gun metal -
Yeah, also not a fan of either, id choose Hyper Black if you wanted black to be honest. If I had to go with a choice from yours however, Gloss
-
This is one of the things ive noticed, a cold start is so loud and raspy now! haha FYI, this, a exhaust system, intake and plenum spacer netted me 16 BHP IIRC and about 20lbft of torque after my remap at abbey.
-
Id like it too!
-
Me too, and I do feel bad about it, but if he hasn't ever seen any examples of it done "properly" then he may well be happy with it, theres so many issues with it, its not even funny! It must be a crazy difficult job to do, but Jack at Royal Steering wheels seems to get it spot on every time TBF... Agreed, they may look a little strange, buf after holding one all the weird looking-ness was put aside in my mind. Hence why I went for one. OP, id seriously try to get thjat returned. You can pay less and get it done properly from a forum trader, or Royal Steering Wheels and know the result will be a good one.
-
Wings and Wheels at Dunsfold 28th of August.
cs2000 replied to DDay's topic in National Events & Shows
Quite fancy this, I'm in. Il add +1 for now, but this may not happen depending on if shes working or not. 1. DDay - CF54 VGL - Blue - parade. +1 2. Darkside- DK51 DEZ - GM - parade (If not too low) - +1 (maybe) 3. Rich260 4. Payco -PA04YCO - GM - Parade 5.Zippypooz - N44SSN - Colour? - Parade (if not too low) 6. terry06 - FX05 PVT- Yellow - parade +1 7. Chippychip123 - UK04 ZED - Brickyard Red 8. Edd20022 - GU56 AZO - Kuro Black - parade - +1 9. Dunks - PHZ 4136 - Sunset Orange - Parade (if not too low) +1 10. Pritchard 11.GizmoGold -G15MO V - Blue - +1 12.nismoandy - WP06 FNX - Silver - Parade (if not too low) 13.Rs200 -X5 HPL - GM - Parade 14.cs2000 - OO04 MyZ - Silver - Parade (If not too low) - +1 (maybe) -
Don't forget the rasp that you will get at around 3500 ish RPM, it bugs the heck out of some people, I like it though. But yeah, without a remap you just get more noise, you need a remap to get the best out of all your mods.
-
Sorry but I have to agree with this mate. My wheel looks exactly the same (apart from the colours) and it cost 195 from jack at Royal Steering Wheels It could be the picture, but the left thumb grip looks wrinked or mis-shapen somehow. The bottom leather part on yours is also wrinkled and the top stitching around the 12 o clock strap looks a bit odd. Sorry mate but id be asking for my money back and going to Jack.
-
Just an UpRev remap mate They run the car on their Hubpack dyno and then modify parameters in the ECU to get you more BHP and torque. They recommend of course that you perform all the basic breathing mods, ie plenum spacer, intake, exhaust Anyone notice Mark had the computer in the Dyno room set to the wrong correction method. With SAE I was showing over 1000 Nm of torque! haha. This was corrected on my printouts though
-
I've started reading up on these this week. Looking for mid range - if you find anything interesting please share Matt, i have recently upgraded to the MiVue 518. Theyre refurbished on ebay for something like £80.00 iirc. Good little units, cant fault it so far and comes with GPS embedding into the video.