

cs2000
-
Posts
2,628 -
Joined
-
Last visited
Content Type
Profiles
Forums
Events
Gallery
Store
Everything posted by cs2000
-
To try and get the word out there, for the next 7 days (ending midnight on Jan 5th), both versions of the brackets will give you an automatic price reduction of 30%, this is a crazy discount and will NOT be repeated! Click To Order This means you can get the brackets at the following prices whilst stocks last: Cruise Control Only - £31.50 Cruise & Audio - £42.00
-
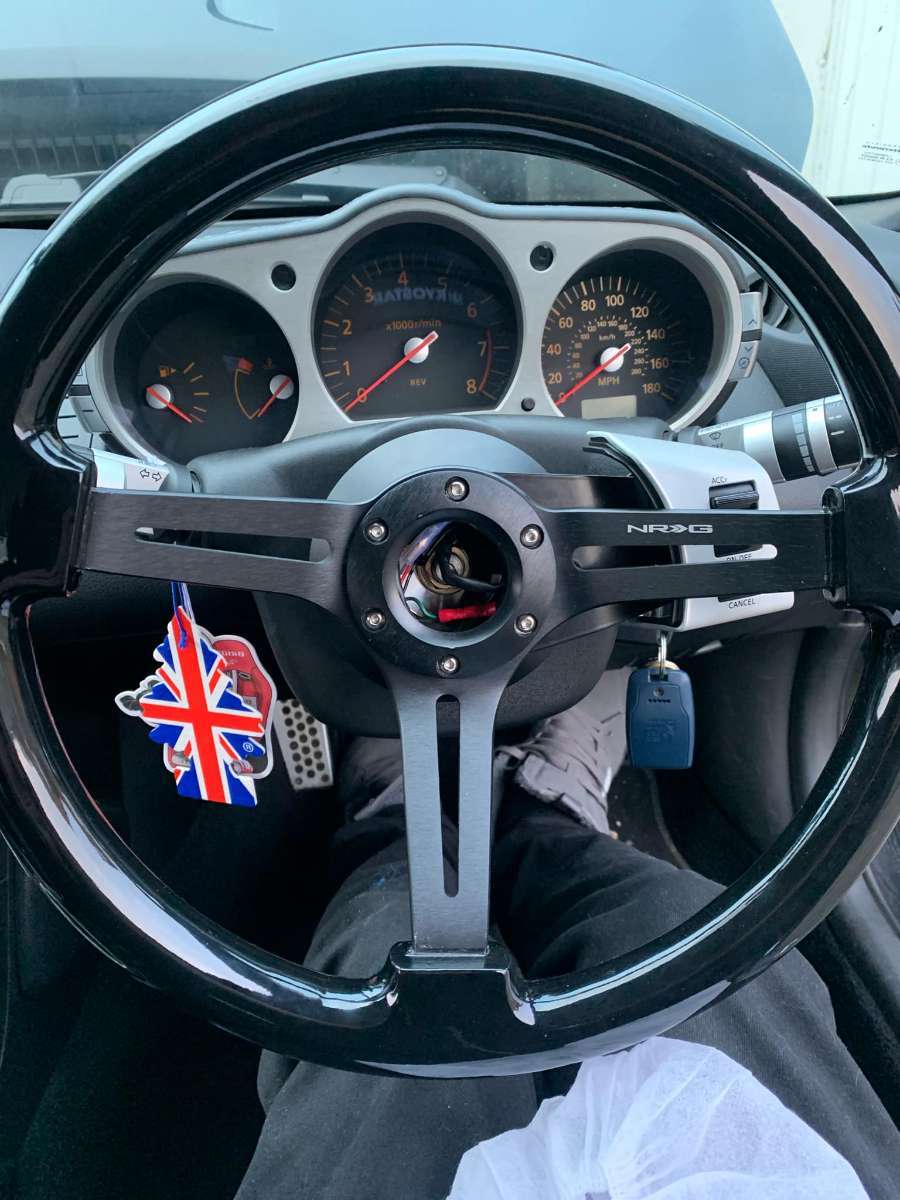
Hey guys and girls. I have been developing this product for the last few weeks and thought you may be interested. They have been built to the same specs as others on the market, just at a cheaper price and made in the UK. I sadly no longer own a Z, so have given 3 pieces to members of various 350z Facebook groups, all are extremely happy and report no fitment issues! So, quite simply, do you have a 350z with an aftermarket steering wheel but nowhere to mount the OEM steering wheel controls? Well this is for you! Don’t bother trying to cut your own bracket out of scrap metal or deal with import taxes or middle men buying brackets from the USA, invest in a solid CNC laser cut piece of powder coated loveliness! This simple to install bracket fits all 6x70mm PCD aftermarket wheels and provides a safe secure place to place to mount your steering wheel controls. Sold in a single sided or double sided adaptor (for use with Cruise Control only or Cruise and Audio controls). Made in the UK from 3mm aluminium and powder coated black for a sleek look. Several in-stock and ready for dispatch now over on my website at this link https://www.cs2000-z-tech.co.uk/collections/350z-compatible-modules/products/350z-steering-wheel-controls-relocation-bracket Prices are: £45 for a single sided bracket (Cruise Control Only) £60 for a double sided bracket (Cruise Control & Audio Controls) This price is for the bracket only, OEM steering wheel controls not included & includes free postage within the UK. As a reminder, 350z-UK club members have and always will get a 10% discount for anything in the site by using code "350zuk" at checkout
-
Have created a How-To for this now, i no longer offer this service in-person.
-
So rather than sell the service, since i no longer own a 350z, i thought it about time to share this info. We all know the pedal dance to pair keys to the BCM which allows the button on the keys to unlock the door, but if you had a brand new key, or had lost them all, you had no way to add new keys to NATS so they would actually start the car, well, with a bit of software and a cable, now you can. Last time i checked, prices from local specialist locksmiths and Nissan main dealers range from £110-£200+ depending on your location and if they have to order you a key. Nissan also have to send off for the codes they require to program to NATS from Nissan HQ which takes a few days. Software Needed You will need to purchase whichever Nissan Datascan version matches your car, this software is amazing and is similar to what the Nissan Consult II offers, it can read modules normal OBD readers cannot as it was coded to replicate Consult II features. Nissan Datascan II (For DE Cars) £29.50 - https://nisscan.com/product/nds-ii-windows-pc/?v=7885444af42e Nissan Datascan III (For HR and Rev-Up Cars) £36.00 - https://nisscan.com/product/nds-iii-windows-pc/?v=7885444af42e ICU to NATS Pin Calculator - https://mega.nz/file/M9l3zJyR#TLDF_-AHx2AUjU__SpN0CAqH7U0546VTHFQ3oG_FYo4 Hardware Needed You also obviously need a new key blank with an immobiliser chip and a OBD cable, the maker of Nissan Datascan says to use Vag-Com cables. Both of these items can be found in many places online, but here are two examples. You will also need to have the key cut to match your ignition barrel. New Key Blank with Immobiliser chip - https://www.ebay.co.uk/itm/116278330690 Vag-Com OBD Cable - https://www.ebay.co.uk/itm/184531472003 Get your NATS PIN Code 1. The pin for many nissans upto 2008 will simply be 5523, if your immobiliser has an A in front of the serial number, try this code first. If it fails, we can generate the key 2. Run the ICU to NATS Pin Calculator software and you will see an example of the sticker we need to find. 3. To access this sticker, you need to remove the 4 screws underneath the lower steering wheel cowling and you should be able to bend it back far enough to see the ignition barrel, if you use your phone camera you should be able to get a picture of the sticker located on the top which should look very similar to the example one shown. 4. I have done a few of these and the positions of the numbers does seem to vary, so try a few numbers that you see and get a few potential codes ready to go. The numbers will always be the same length as shown in the example, even if they're in different places! 5. Simply enter the numbers in the rough locations shown and you will get a NATS PIN. Key Coding Process 1. Connect the OBD cable to your car and open the NDS software 2. Turn the car to ignition on 3. In NDS, select the "ECM" tab and click Connect 4. Once connected, click "Work Support" 5. Enter your NATS code in the "Program Immobiliser Key" section 6. Click "Program" 7. The software will warn you that all keys will be erased. If you have a working key(s), make sure you have this with you as you will be re-adding all keys back into the ECM. Click Yes to continue. 8. The key currently in the ignition will be programmed, you will then see a message. If you have more keys, follow the instructions shown. Turn the ignition off Remove the key, Re-insert the key you just programmed Turn the ignition to on for 5 seconds Then back to off for 5 seconds, Then insert the second key Turn the ignition to on for 5 seconds Then back to off for 5 seconds, Repeat for as many keys as you have 9. If you have no further keys, or have registered all the keys you have, simply follow the message and do the following Turn the ignition off Remove the key, Re-insert the key you just programmed Start the car SImple as that! New keys added to NATS for under £50 all-in!
- 1 reply
-
- 2
-

-

-
For anyone that’s interested, il post details tomorrow. You need some software, one you have to pay for and one that’s free, plus a cheap cable. Not too difficult to do
-
Absolutely, the website is all set up for international postage, I send quite a few of these to the US! the link is in the first post! Also check for the updated version with the “magical burnout mod” as that is the most popular version
-
Sorry guys I didn’t see the previous notification. Yes I still make and sell them, just not active in this community anymore.
-
Sorry for the image issues guys, fixed it and edited my original post
-
If you've done it today mate, nothing has come through yet! But appreciate the comment
-
Ignore...
-
Epic thread revival batman! Just a heads-up that although the Z and I parted ways last year around June time, it went to a forum member who has been looking after it since. Sadly he didn't have the best start to Z ownership, the least of his issues in the last 12 month being a failed alternator on the night he picked the car up, resulting in two of us pushing the car uphill on a dual carriageway in the dark to get to a layby... Anyway, the car is now running and driving again. Il let @Ottleydrift fill you in on the remainder of the story and to continue the cars "progress" thread if he sees fit
-
From previous years, anything from around 5 miles out, you're liable to have police, both visible and hidden, in cars and on bikes aswell as many mobile speed vans. In previous years when ive organised a convoy i took the lead as i had experience of where they were based in past shows. They started really as soon as you got off of the M1 Also, ive made a slight change to the list, i am dropping off as my Z was sold 12 months ago, however my place is taken by its new owner @Ottleydrift, not sure if he has any track time booked. I will still be there however, but im not allowed in early in my non jap car lol 1. andy James PAID 2. Sebastian PAID - Track 14.40 3. Stephanie 4. Andy_Muxlow PAID 5. SHEZZA PAID 6. Silverthorn PAID 7. Ottleydrift PAID 8. nissmoandy PAID 9.Paul K - Paid (ticket rolled over from last year) 10. V1H PAID 11. Matthew Thain PAID 12. Jamie Thain PAID 13. whitevanman. PAID 14. Mark350Z. PAID - Track 14.40 15. luigi350z PAID 16. Sarah PAID 17. zzincubus (Len Meakin) PAID 18. Flashback - PAID 19. FruitPolo PAID 20. BUSTER PAID 21. Trott + 1 PAID 22. George (tarmacsportz) -PAID 23. Valy - PAID 25. MattRwebB - will pay end of month 26. Terry - Paid 27. Jamie - paid 28. checkle91 - PAID 29. AndrewK - Paid 30. Jenso - PAID 31. Tauvp - paid 32. 14N - PAID 33. Ross dean- PAID -track 15-20 34. Face_Eator PAID + Handling course 35. jamstar007 PAID Track time 9.40 36. ILikeDolphins PAID 37. kostask PAID 38. ASugars888 - Paid 39. Humpy - PAID 40.KBAD - Paid 41. Alex 350 - Paid 42. silky- Paid (rolled over ticket) 43.Ry4n -Paid 44.NICECUBED - PAID 45. Dannyg - PAID 46. RDON -PAID 47. Mathias - PAID 48. omegacloud - PAID Track 10:20 49. Kaikora - PAID 50. prodrive11 - PAID (track: 9:20, 10:20, 11:40) 51. 350Zeta - PAID 52. Lbow350z - PAID 53. Gregglecakes - PAID 54. harvers - PAID 55. Zelda - PAID 56. KG350z -PAID 57. Roamy (Luke) PAID 58. D-NISMO (Dan+1) PAID 59. clacksonator PAID 60. Ian Neild PAID, track 10.20 61.350z-btb PAID 62. Footbola - PAID 63. Kieran McNulty - Paid 64. Jonnymonno- Paid 65. Edd20022 - PAID 66. Budbongo - PAID 67. pagan - PAID 68. Stuggerz 👻 - PAID 69. Bunning - PAID 70. Jinshim (+1)- PAID 71.Zephyrz33-PAID 72. D7MOA (+1) - PAID 73. OLI38 - PAID 74. George1966 - PAID 75. Rallyboy1 (+1) - PAID 76. Nathangunniss - PAID 77. cam_Fearn - PAID 78. Nino - PAID
-
Hey guys, As many of you will have seen, i sold my Z last year at some stage and am now loving my XFR, however that doesn't mean ive stopped work on the Z in terms of mods. Im still working on the launch control system which should be out soon hopefully. Im still selling plenty of Magical Burnout boxes through my website which has been running for a while (http://cs2000-z-tech.co.uk/) but lately have purchased a vinyl cutter and have been selling Brake Caliper stickers for the XF guys such as the below in a lovely rainbow silver (when the sun hits it): My question to you guys is, what in terms of vinyl's or sticker designs do you want to see? I have got a few different brake calliper designs ready, i just need to find time to add them to the stores page, but what else do you guys want vinyl's or stickers for? If anyone wants something custom like an Instagram tag or whatever, hit me up, prices will be cheaper than eBay for the same item and I am using top quality outdoor rated vinyl.
-
Cannot recommend the Jaguar XFR enough. All the power youre ever likely to need (510) but with 5 doors, comfort etc.
-
Thanks for the video! So glad you're happy with the mod! @vroom811 would you mind if i embedded the video on the shop page, its very well done!
-
Well, the time has come, after 7 years of ownership, my longest time every owning a single car (what, i get bored easily), last weekend i picked up a 2011 (2012 MY) Jaguar XF R. This monster comes with a buttery smooth 5.0ltr supercharged V8 with factory specs of 510BHP and 0-60 of under 5 seconds, not to shabby for almost 2 ton's of car After 3 days of ownership, i contacted some well respected mappers in the Jaguar XF scene and had their map loaded onto the car, which now means 570bhp and 700nm of torque. Genuinely a scary thing to drive at speed now, the acceleration is mind blowing. The Z, by no means is it a slow car, but the XF R simply redefined for me what a fast car actually feels like. After a single test drive i was sold. Its the best of both worlds car. Great amount of interior space for people and things (needed as you grow up and start thinking about a family) but stupid fast for when im on my own and want to have a play. It is sadly noticeably less stiff than the Z, but it really isnt designed to be the same type of vehicle! In the 7 years of ownership, the Z went from a bog standard vehicle To something i truly enjoyed driving and indeed building. She was/is by no means a show car, shes has tatty paintwork and a smokey exhaust thanks to failing valve stem oil seals, but shes mine and i love her! I had the amazing pleasure of attending multiple Japfests and met some amazing people there and through this club as a whole. Things that im truly happy ive experienced over the years! Il still be sticking around the club, some genuinely good people here and i still have my electronics goodies to sell over at https://www.cs2000-z-tech.co.uk/ For now, il leave you with some images taken after 7 hrs of cleaning and polishing the new whip The Z is now sold to a friend who i work with, he is intimately familiar with its issues and it will be used and abused by him, just as it has been during my ownership, so at least il get to see it when im in the office! He's collecting it next Thursday, but for now its SORN on my driveway looking all sorry for itself! Bye Bye Z, has been a blast!
-
- 5
-
-
Right everyone, Kelsey have just announced that Japfest & TRAX will be running together on the 4th of October, so it looks like we will get an event this year. Sadly, it looks like i would have sold my Z before this time Luckily its going to a friend who has been with me to Japfest in the past. Im not sure if we will attend October or next years event, so for now, consider this convoy cancelled.
-

350z ONLY Full TCS & VDC Disable With Brake Bypass (Burnout) Mod
cs2000 replied to cs2000's topic in Member Traders
Hey guys, Made some changes in how im selling these modules and all future modules. I will still handle PM's and questions on the forum, but if you want to place an order, you can now hop onto my website www.cs2000-z-tech.co.uk and get your order placed! The website is built with Shopify, its fully secured and i dont ever see your card details/what not! Shopify handle the online shopping platforms for some huge companies and have a great reputation. You can pay with Google Pay, Apple Pay, Credit/Debit card or PayPal. When you do buy, you fitting guide will be delivered to you via email automatically! As a final thank-you to this club, you can use discount code "350zuk" for 10% off of any item! (please keep this code to this club only however, i will be tracking where code uses come from. However!!! Up until the 30th of June 2020, i will be offering a higher discount of this module. With the help of a club member, we have tested and verified this module as working on the Manual 370z's too! If you use the link below and use code "370BURNOUT" youll get an extra special price. https://www.cs2000-z-tech.co.uk/collections/370z-compatible-modules/products/burnout-brake-boost-tcs-vdc-disable-module?variant=31711081136217&fbclid=IwAR1nBuvsHJYpXQZz2agwRMDFpmEvN_yIXtLSoqJU7_HQXBkXXsnMcehBgAI The 350zuk discount code will always be valid on all products. The 370zBURNOUT code is only valid until the end of June on the specific product in the link above! -
Hey guys, Made some changes in how im selling these modules and all future modules. I will still handle PM's and questions on the forum, but if you want to place an order, you can now hop onto my website www.cs2000-z-tech.co.uk and get your order placed! The website is built with Shopify, its fully secured and i dont ever see your card details/what not! Shopify handle the online shopping playforms for some huge companies and have a great reputation. You can pay with Google Pay, Apple Pay, Credit/Debit card or PayPal. When you do buy, you fitting guide will be delivered to you via email automatically! As a final thank-you to this club, you can use discount code "350zuk" for 10% off of any item! (please keep this code to this club only however, i will be tracking where code uses come from.
-
@Keyser Its been said before i know, but genuinely appreciate seeing your random shed activities Theirs not a lot happening in peoples lives right now, seeing you occupy your time with the bug, Z-Shed improvements, success or failure genuinely gives me a chuckle. Always like watching you work when ive been down to the shed, so this is no different As for those Evolution saws, i have one, have had it for a couple of years. It was cheap compared to other brand names models and have never had an issue with (ab)use ! Not that it gets anything like the amount of use as i suspect yours does!
-
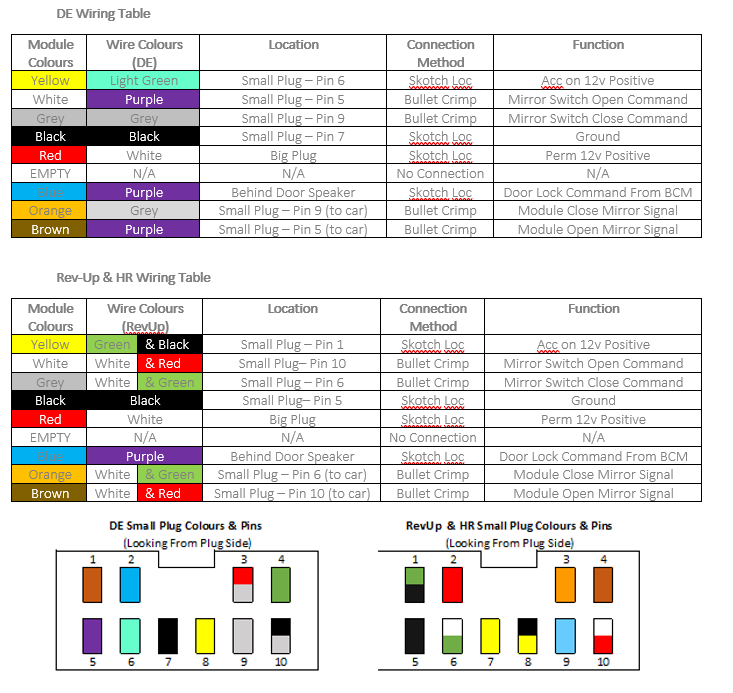
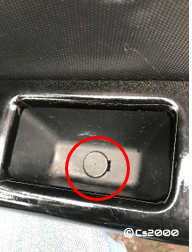
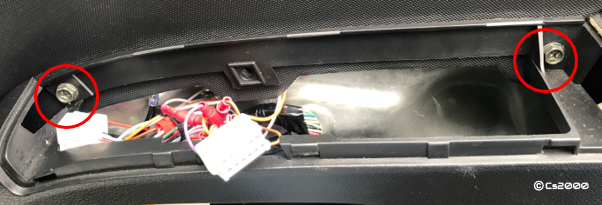
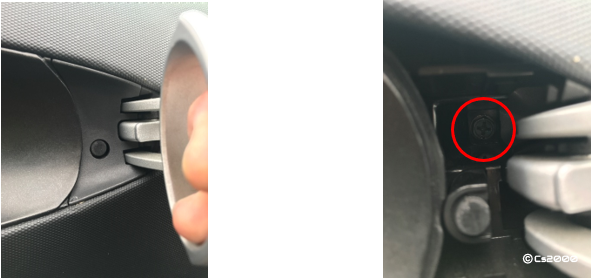
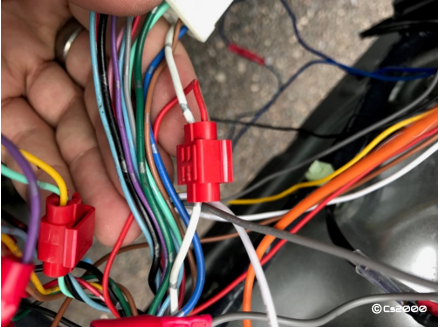
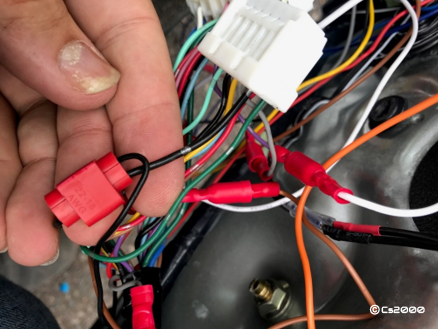
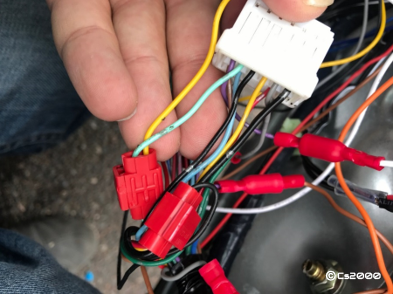
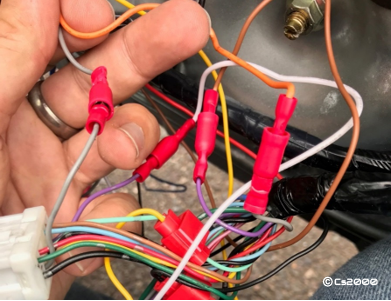
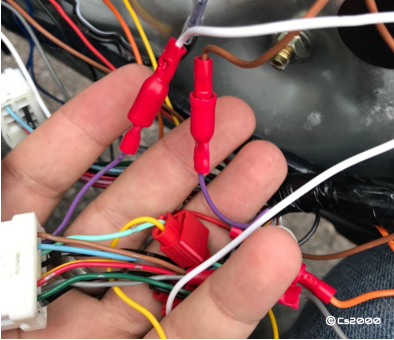
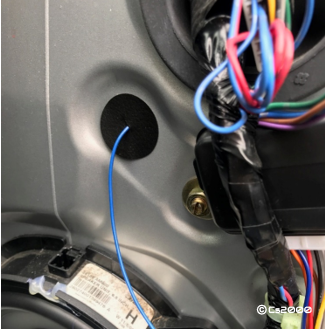
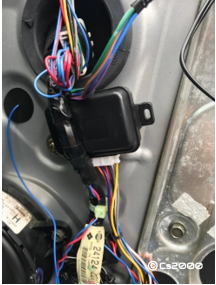
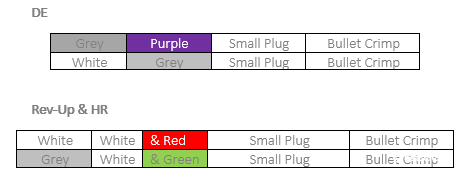
Hey all, you may remember the ever popular auto mirror folding mod, this is a little module that Flyboy and i used to sell, but demand has been non existent for a long long time now so im releasing details on how to do this yourself! This is a copy + paste of the guide i wrote to install these things Tools: Philips head screwdriver Pliers Wire Crimpers Wire Strippers You also need to purchase a universal Mirror Fold module from eBay, such as this one. https://www.ebay.co.uk/itm/223770257610 If this link dies, try this search term eBay Search Lastly, you'll need a bunch of red scotch loc connectors, these are also available on eBay. Now for the magic, you need this colour coded wiring guide first as a reference. Remove Door Card Remove the rubber bung and screw in the door card handle/pocket on the driver’s door as shown below Lift up on the door controls piece and remove the two electrical plugs, after this, remove the two screws shown here Remove the plastic trim from behind the door handle and unscrew the screw deep inside the door card Pull the door card off its plastic clips around the edges and then once all released lift upwards to remove the lip from where the window glass rolls down. Set aside the door card for now. -------- Wiring in the Module The module has wires as described on the table included in at the top of this guide, connect them as described in the table, or follow the info below. NOTE: The photos shown are taken with a DE car, if you have a RevUp or a HR, make note to READ the instructions and refer to the tables at the top for correct colours. RED WIRE: Get the red wire from the module and then locate the thick white wire from the larger plug. Splice these two together with the scotch loc connector. BLACK WIRE: Get the black wire from the module and then locate the thick black wire from the smaller plug. Splice these two together with the scotch loc connector. YELLOW WIRE: Get the yellow wire from the module and then locate the Light Green (DE) or Green & Black (RevUp & HR) wire from the smaller plug. Splice these two together with the scotch loc connector GREY & ORANGE WIRES: Find the Grey Wire (DE) or White & Green Wire (RevUp & HR) and snip this part way down. Locate the Grey wire from the module and connect this to the side of the wire going to the plug. Locate the Orange wire from the module and connect this to the side of the wire going to the car. WHITE & BROWN WIRES: Find the Purple (DE) or White & Red Wire (RevUp & HR) and snip this part way down. Locate the White wire from the module and connect this to the side of the wire going to the plug. Locate the Brown wire from the module and connect this to the side of the wire going to the car. BLUE WIRE: This is the only tricky one. You need to remove your door speaker and locate the wiring loom tucked up inside of it. Peel back some of the plastic loom covering and locate the purple wire as shown. Connect the Blue wire from the module to this purple one using the included scotch loc connector. I would advise routing it through this little paper grommet shown here below -------- Testing Tuck the module behind this thick conduit of wire and stick it to the door with the included sticky pad. This keeps the module safe and stops it vibrating in the door. Just make sure the connector isn’t under any pressure as this can make it come disconnected. Re-assemble the door card and try your mirror switch. Make sure the mirrors fold in and out according to the switch. Next, shut the door and press Lock on the key fob and ensure the mirrors fold in. Press unlock and make sure they fold out again once you turn the car on. If it all works as expected, re-assemble everything tidily and enjoy your new mod. NB: If once connected your mirror switch works backwards ("Open" on the switch closes the mirrors), simply reverse the Grey and White module wires so they’re connected like this. If you have any issues, double check your wire crimps were done properly. Listen for the relay clicking in the module when you lock and unlock the doors, this is a good indication of whether power is being supplied to the unit and its receiving the lock pulse. Also refer to the table at the top of this page and identify which wire colour does which function and reference this with the plug drawings just below the table. This should help you troubleshoot if something isn’t working.

- 1 reply
-
- 3
-
-
-
Haha that's a shame, I would be interested if you found the time of course! Wouldn't need your coilovers however as I have the BC BR's already, just the lines and everything else that goes with it.
-
Nice sleek install, like it! If you can find a 5v LED and can modify your OEM button, you will be able to get illumination back which is helpful as an indicator, but i haven't ever really taken apart a oem button to look how possible that is.
-
Everyone thats paid, modules are all posted! Only a few more days left at this price 1. P15ul T - Posted 2. John Steers (Club Facebook Group) - Posted 3. Andrew Mahers (Club Facebook Group) - Posted 4. Spacemaker - Posted 5. Camz34 - Posted EDIT: GB is now CLOSED! Modules are still available as always, but at the full price as shown on the first post! Thanks to all GB participants
-
350z ONLY Full TCS & VDC Disable With Brake Bypass (Burnout) Mod
cs2000 replied to cs2000's topic in Member Traders
Everyone who's currently paid, your modules have been posted! 1. Paul Barlow (Club Facebook Group) - Completed, Posted 2. Jimmy Nsouli (Club Facebook Group) - Completed, Posted 3. Ben Simmonds (Club Facebook Group) - Completed, Posted 4. Alex Barmby (Club Facebook Group) -Completed, Posted 5. Tom Wray (Club Facebook Group) - Completed, Posted 6. Ryan Lakey (Club Facebook Group) - Completed, Posted 7. Robert Johnson (Club Facebook Group) - Completed, Posted 8. Mitch Squires (Club Facebook Group) - Completed, Posted 9. Harrison Schultz (Club Facebook Group) - Completed, Posted 10. Garrett Mc Monagle (Club Facebook Group) - Completed, Posted 11. Antonio Choi (Club Facebook Group) - Completed, Posted 12. Scott R Mitchell (Club Facebook Group) - Completed, Posted 13. John Clark (Club Facebook Group) - Completed, Posted 15. Gareth Hyndman (Club Facebook Group) - Completed, Posted 16. Dan Skippy Thomas (Club Facebook Group) - Completed, Posted 17. Deville Nanny (Club Facebook Group) - Completed, Posted 18. Bluer_01 - Completed, Posted 19. Bozhidar Tashev (Club Facebook Group) - Completed, Posted 20. da.murf - Completed, Posted 21. Sensen - Completed, Posted 22. Nathan Walker (Club Facebook Group) - Completed, Posted 23. Lukas Karolaitis (Club Facebook Group) - Completed, Posted 24. Luke Bowler (Club Facebook Group) - Completed, Posted 14. Keiran Blackburn (Club Facebook Group) - Payment Requested EDIT: GB is now CLOSED! Modules are still available as always, but at the full price as shown on the first post! Thanks to all GB participants Ryan Lakey from the Club Facebook Group won the "name out of a hat" competition and his module has been refunded so its free!